
Installing an eRVin Software Image
What’s an Image?
An eRVin image is a data file that contains all the necessary software for your eRVin hardware allowing it to control your RV, this includes the operating system (OS) as well as all the application and configuration files. The uncompressed size of the image is about 3.5GB, the zipped download is about 1.1GB.
This post describes how to download an image and flash it to a micro SD card. The download might take a while depending on the speed of your internet connection, however the flashing process is very simple and takes just a few minutes. Once the image is downloaded to your Mac or Windows PC, it can be flashed to a micro SD card, then the SD card is simply removed from the PC/Mac and inserted in your eRVin Raspberry Pi (with the power off).
Update 20210217: Because the OS doesn’t change that often, but the configuration files do, as of eRVin OS v0.5, the image has been unified. Now there is just one ‘eRvin OS’ image for everyone and separate configuration (aka ‘flow’) files for various coach models/floorplans. The configuration files are available for download and installation by the end user thru a new menu built-in to the eRVin “app” (aka “dashboard”). The flow files are tiny compared to the image so download very quickly. This makes it much easier and faster to load new or updated configuration files. It also makes it a lot easier for me to create and post them.
Update 20220807: There is a new imaging procedure described below. It uses the Raspberry Pi Imager instead of Balena Etcher. The primary benefit of the RPi Imager is that it allows configuration of your WiFi info directly in the imaging tool, thereby eliminating the additional (and sometimes troublesome) steps required with the Balena Etcher process (for you techies, the RPi Imager eliminates the need to create, configure and copy a wpa_supplicant.conf file to the boot partition).
If for some reason you prefer to use the Balena Etcher method that procedure has been archived here.
Changelog:
The changelog lists updates, changes and fixes for both eRVin OS and the eRVin configuration files (flows).
Make An Image:
Gather the following items:
- A Windows or Mac system with a connection to the internet.
- A 16gb or larger Class 10 micro SDHC card. An 8gb card should work but we recommend a 16gb card to provide for future expansion. 32gb or 64gb cards will work also but may be overkill unless you know you will eventually require the additional resources. We recommend a well known name brand SD card to avoid potential quality and/or performance issues. The Sandisk cards have so far proven to be very reliable. While the eRVin devices have been extremely reliable, we suggest always having a second backup micro SD card on hand, especially if you will be experimenting with your own modifications.
Note: Check pricing as of summer 2022 a 32gb card was cheaper than a 16gb.
- An SD card reader, either built in to your Windows or MacOS device or a USB dongle.
- The SSID (network name) and password for your RV WiFi network where eRVin will be connected.
Create your image:
- Download an eRVinOS image file to your Windows or MacOS device. The newer image files have a format of ervinos_version_yearmonthday.zip such as ervinos_v060_20220819.zip In most cases you will want to chose the image with the most recent date. Image files are around 1.1GB so could take a while depending on your network. For more info on which image to choose see here.
- Download the free Raspberry Pi Imager application to a Windows or Mac.
- Insert the SD card in the Windows or MacOS device. Ignore and cancel any error messages or prompts to format the card.
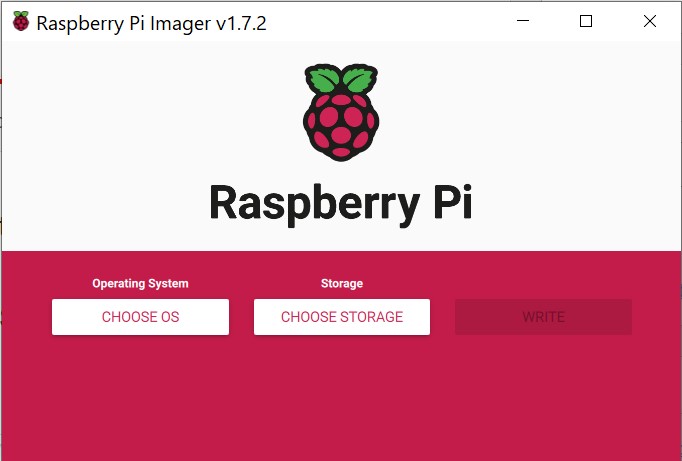
- Run the Raspberry Pi Imager application.

- Click “CHOOSE OS”.
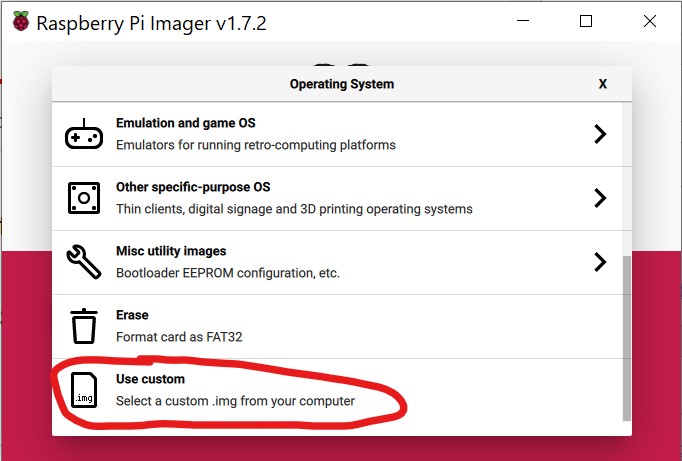
- Scroll down and select “Use custom”:
- Navigate to the downloaded eRVin image on your Windows or Mac, select it and click open.
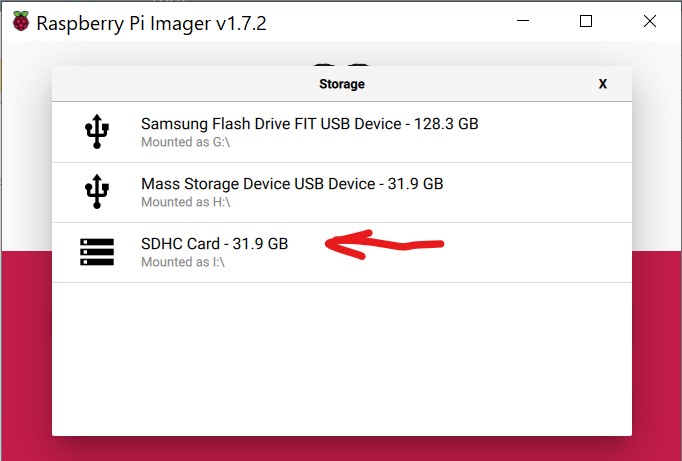
- This will bring you back to the main screen. If not already, insert your SD card and click “CHOOSE STORAGE”. If you have more than one external drive, be sure to select the SD card that you want to copy the image to. On my PC I happened to have several devices attached, your results will look slightly different.
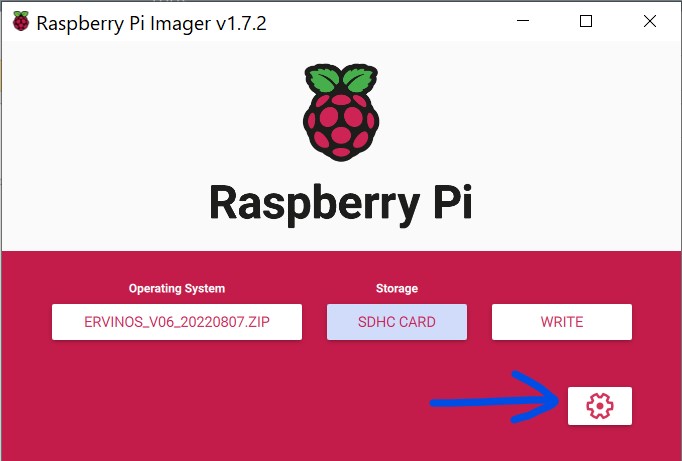
- This will once again bring you back to the Main screen. Now click on the Gear icon so we can preconfigure the WiFi and some other things:
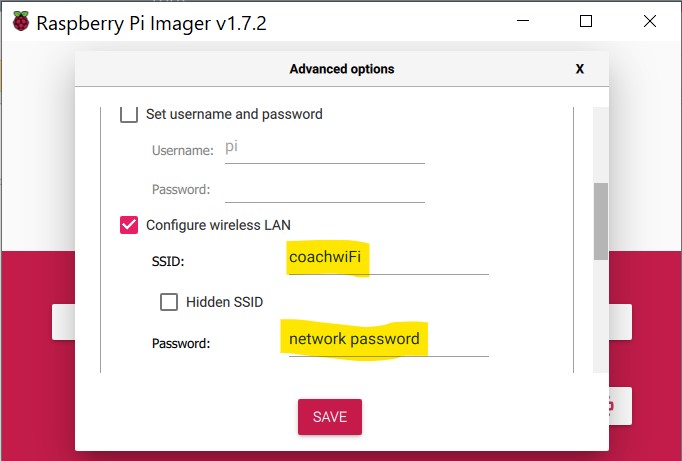
- Here you want to check the box next to “Configure Wireless LAN” and enter the network name (SSID) and password for the WiFi on your RV.
- Now scroll down and set “Wireless LAN Country” to US – don’t bother with the drop down, it takes forever to scroll thru the country list, just type in US. Then check the box for “Set Locale Settings” and set your time zone and keyboard layout.
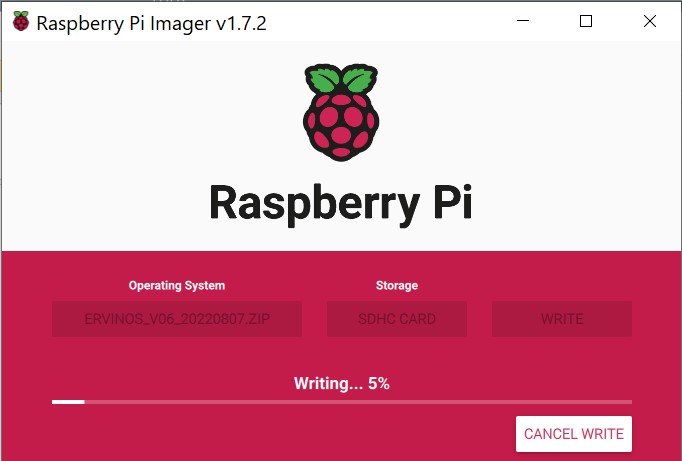
- Click Save. Once again you will return to the main screen. Now click the “WRITE” button.
- Confirm you really want to erase the SD card and go get a coffee.
- Ignore and cancel any messages or windows that might pop up at this point asking you to format or insert a card. You should see the status bar progressing, after writing it will do a verify. On my windows laptop the image build took about 5 minutes.
- When its done you will get the following display so go ahead and remove the card from your Mac or PC:
- Make sure the eRVin device is powered off and insert the newly imaged SD card into the micro SD slot on the eRVin Raspberry Pi.
- You are now ready to boot eRVin! For the next steps go to Connecting eRVin to your RV.


Good morning,
Just found the information and interested in building for my Entegra Cornerstone 45k (formerly 45 DBQ) Doe this function side by side with Vegatouch or is it a replacement system? My system does not offer climate control via the Crestron app this would be a desirable function if available?
Hi Mark, what year is your coach? And it is a 45K floorplan? Did you mean you previously had a DEQ or DLQ? eRVin functions side by side but may not be able to control everything. Unfortunately HVAC is one of those things. It is definitely doable but needs to be reversed engineered. I don’t have a Vegatouch coach so haven’t been able to do that reverse engineering. There are some eRVin users that say they have but I don’t have any details. You might want to contact Firefly and see if a Mira or Eclipse option is possible for your year. That would be a more fully featured implementation. If on tbe other hand you like a challenge and are interested in doing a little CANBUS sniffing and coding, eRVin might be for you.
Hey Rob, I decided to transition to the eRVin OS v0.6. I haven’t, yet, plugged the Rasperry Pi back into the coach to load the configuration file to complete the update.
Just an observation: the current version of the Raspberry Pi Imager is v1.8.5. The prompts are slightly different from the v1.7.2 in your tutorial. Of course, with my in-depth programming skills (I’m joking), I was able to navigate the process. When you’ve got nothing better to do (????) you might consider an update.
It’s possible that you might see an increase in eRVin interest following your recent posts on iRV2 (Firefly Integration Multiplex panel pricing).
Thanks for all you do and Happy New Year!
Will your hardware work on newer Spyder Control Module G12? 2020 Tiffin Allegro Red 340
Hello,
I have the newest software installed and do not see the 2018 Entegra Cornerstone 45B as an option. I updated my Raspberry-pi to the 2017 Anthem/Cornerstone 44B and most switches work. I have started an issue list and am willing to share and work with someone to update an image to work on the 2018 Anthem/Cornerstone 44B. I have minimal programming knowledge, but am vary familiar with computers. Please let me know if I can help or if an image is coming.
Thanks,
Suggestion: Consider adding a backup routine to allow the user to tar up his configurations including node-red and download them to a desktop. Recovery could consist of writing the original image to a new card, booting it and then restoring the tar file and overwriting the config files.
I have tried installing the .5 and .6 images and keep getting an error when trying to connect to Pi. The image install goes fine. The device connects to my wifi network fine. But when I open a browser I get. 502 Bad Gateway error from nginx. Any suggestions on what to try?
Jeff, it may be that you are not waiting long enuf for the boot process to complete. It takes almost 5 minutes before all the processes load and start. I usually see that message even it is still in the process of booting. Let me know if the problem persists. Is this a RPi4? If so the v0.6x should be ok, but v0.5x is incompatible (fix in tbe works).
The error is still there after an hour or two of plugging it in. Its a Pi 3b.
Rob – any other ideas to try?
I was unable to get the version .5x to boot on a Pi 3b+, only the .6 version would boot so it might be a kernel mismatch? Connect a monitor to the HDMI port and watch what happens. If you never get the Pi logo, it isn’t booting your image.
Hi Rob, been using eRVin on my 2017 Anthem 44B for a couple years. Like others have said, I really appreciate your work on this app.
A couple days ago I updated to version 062_2022. I’m unable to reconnect to the RPI (P3 mB) due to getting a 502 bad gateway message. I tried going back using the 051_2022 version but still received the 502 message. I also tried a different RPI 3.
Any tips on what to try next?
Thanks again!
For future readers I found a fix for this. Don’t change the login name in the server settings, leave it at ‘pi’. Rednode looks for that exact user name and if it doesn’t find it, fails to start, webserver can’t connect and returns a 502 error.
Good point, thanks for the post.
Greetings. Can we assume that your image contains all the necessary additions for the PiCAN2? The User Guide from Copperhill, where I got my PiCAN2, lists some software to add, along with setting changes to implement. Thanks.
[…] Installing an eRVin Software Image […]
Wondering if Tiffin Configs from coach proxy can be added to your much better eRVIN application? Obviously coach proxy is getting a bit long in the tooth, I really like what you have done with eRVIN and am wondering if I can modernize my 2019 Tiffing 33BR setup.
Thanks, still very much a work in progress, I’ve had to put eRVin on hold for a bit due to some personal issues. However, what you are suggesting was on my road map, I just haven’t had the bandwidth to sit down and do it. Also FYI eRVin isn’t really an application, it’s just enhancements to the Raspberry Pi OS and updates to some of the software modules like Node-Red.
I’ll describe basically what needs to be done. I don’t know the level of your expertise, so apologize if this is over your head (or under it). If you need more explanation, let me know and I’ll try to be more specific.
In eRVin, to switch between configurations (as can be done from the eRVin “app” under System/Install Configuration File) basically all that happens is I replace the node-red flows_coachproxy.json file as well as the device.db file for ha-bridge (Alexa interface). Note that Alexa/ha-bridge may no longer work due to changes made by Amazon.
To do this for your Tiffin, first you need to create the proper flows_coachproxy.json file, then you will need to manually copy it to an eRVin image, follow the steps below. Suggest you use a new blank SD card so you can easily switch back if something goes wrong:
First, Install the standard coachproxy image, then select your Tiffin year/model/floorplan/options and let coachproxy update the config.
Test that everything works the way it should.
Connect to the coachproxy Raspberry Pi OS from a pc/mac, you will probably need to do this via SSH and the command line, as far as I know this is the only means of access installed in coachproxy. I *think* the id/password is pi/raspberry.
Using SSH, copy the following two files from the RPi over to your pc/mac:
/coachproxy/node-red/flows_coachproxy.json
/coachproxy/ha-bridge/device.db (if you don’t care about Alexa, don’t bother with this one)
Now install the eRVin image, you will not need to install an eRVin configuration file, the default is fine and it is going to be replaced with your Tiffin file anyway.
Connect to the eRVin RPi. You can still use SSH for this, but you can also use VNC client installed on your pc/mac since eRVin has VNC server installed and the full desktop GUI enabled. In either case, the id/password is pi/ervin2020.
Take the files you copied in step 3 and overwrite the files of the same name at the same path in the eRVin image.
Reboot the RPi.
This will enable the node-red flow for your Tiffin, but within the eRVin OS. This *should* work, however the coachproxy node-red installation was something like version 0.18, the version in eRVin is much newer, at least 1.2 I think. There may be enough changes that some of the older contribs and even some of the core nodes are no longer compatible. You will be able to tweak the dashboard interface in node-red which has had many improvements since v0.18. One word of warning, if you decide to update the node-red contribs to their latest versions, I suggest you do not upgrade the sql lite contrib, last time I tried that it crashed node-red.
I’d be interested in hearing if this works. If it does, send me your coachproxy_flows.json file along with the specifics of your coach year/model/floorplan and I will try and add it to the eRVin configuration server so other Tiffin owners can install it more easily.
Thanks!
Rob
Good morning, Rob,
I just discovered your project and built one of the units. I own a 2016 Tiffin Allegro Bus 40AP. I originally installed the coachproxy image and tested everything. There were two minor problems, but everything else worked correctly. I did not test Alexa or remote access for the first phase.
I followed your instructions to incorporate my working Json file from the coachproxy image into an eRVin image, and here are the results.
The following items worked as they should:
Door locks
Generator
Vent fans
Bedroom ceiling fan
shades
floor heat
tank status
The following controls reflect the current status, but cannot be controlled from the app:
Aquahot
Water pump
The engine preheat does not work or show the status.
None of the individual light controls work. You can move the dimmer sliders, and they will stay where you set them, but you can’t turn any of them on or off. They also don’t reflect the current status.
The all lights on and off work as they should.
The Tiffin configuration menu is available, and seems to work.
I loaded Node-Red on my desktop, installed the dashboard and the file-function-ext module. Here are the loaded version numbers:
26 Dec 08:23:55 – [info] Node-RED version: v2.1.4
26 Dec 08:23:55 – [info] Node.js version: v17.2.0
26 Dec 08:23:55 – [info] Windows_NT 10.0.19043 x64 LE
26 Dec 08:23:56 – [info] Loading palette nodes
26 Dec 08:23:56 – [info] Dashboard version 3.1.2 started at /ui
When I loaded the Json file from the coachproxy image, I received the following errors:
Imported unrecognized types:
sqlitedb
sqlite
throttle
simple-sendmail
Imported:
4 flows
679 nodes
18 configuration nodes
I do not have a programming background, but am willing to learn what I need to help on this project. I will send you the files if you give me instructions, and tell me what I can do to help.
Thanks!
I have tried to flash the mini card twice and it crashes and my pc restarts….any ideas?
Tried again, the decompressing finishes but during the validation process, the pc crashes and restarts.
I noticed there are files on the micro (even though I got the error on my pc). It shows 46.7MB, is this about the size of all the files loaded? (Maybe it is fine, it did complete the flash…..?)
I think I have fixed the issue with the wpa_supplicant.conf file. The copy/paste function originally in this post was corrupting the CR/LF characters. I removed that so the file is now only available as a download. Please let me know if anyone still has issues with it.
My eRVin stopped connecting to my Wi-Fi. I’ve downloaded the wpa_supplicant.conf file and edited it and No Bueno! I’ve tried a separate SD card and still No Bueno! Can anyone help me get connected and back on line. I rely on eRVin for so many things that this is have a huge impact to us since we are full timers.
Thank you in advance!
Is anyone else having issue where the eRVin/Pi won’t connect to the Wi-Fi access point?
Jay thanks for helping track the problem down to a bad SD card…
Hello Rob,
I finally received the cable and connectors to connect the raspberry to the panel. Having trouble with the wifi, the config file disappears from the sd card after connecting the box to the panel. When it didn’t connect to the wifi, I pulled the sd card to look at the config file but its not there anymore. I’ve copied it twice now and same thing, after not seeing it connect I go back to look at it and its not there. Any ideas?
Rob, a lot of people have had issues with the wpa_supplicant.conf. I think there is some kind of issue with CR/LF or something with the file on the site, but I haven’t figure it out. I’ll email you a blank file, so try that. It is normal for the wpa_supplicant.conf to be removed from the boot directory after booting.
Rob
is the source code available for the project or just the image.
Tom, it’s a stock Raspberry Pi OS with drivers installed for the CAN board. It acts as a gateway to/from RV-C and MQTT. The gateway pieces are based on some code originally developed for CoachProxy for Tiffin RV’s. You can find more details about that here: https://github.com/rvc-proxy/coachproxy-os
Also you can simply peruse the /coachproxy/ directory on the device.
Besides the gateway code which is primarily Perl, the core logic is a series of Node-Red flows with several custom function nodes written in Javascript. In the case of repetitive function nodes you will find the actual Javascript in the /coachproxy/home/pi/.node-red/js directory
Is it possible to update to the pi Buster image? Need this as the current release of node-red needs Buster.
Randy, you can just update Node-Red. eRVin is already at Buster. Check under System Information in the Dashboard. FOr example mine says “Raspbian GNU/Linux 10 (buster).
To update Node-Red:
bash <(curl -sL https://raw.githubusercontent.com/node-red/raspbian-deb-package/master/resources/update-nodejs-and-nodered)
See https://nodered.org/docs/hardware/raspberrypi for more info.
Warning, you may have some issues with this because of node.js needs updating too. Here are some notes from my changelog, from about a year ago:
Required sudo apt update && sudo apt full-upgrade before node.js would install above node12, but still required a force via ‘–node16’ at the end of the command below:
bash <(curl -sL https://raw.githubusercontent.com/node-red/linux-installers/master/deb/update-nodejs-and-nodered) –node16
node-red v3.0.2 node.js v16.17.0 Npm 8.15.0 v0.61
node-red v3.0.2 node.js v16.19.1 Npm 8.19.3 v0.53 20230302
replaced settings.js with new version, uncomment ‘contextStorage’ section, set ‘exportGlobalContextKeys: true, set ‘flowFile: ‘flows_coachproxy.json’
Ultimately I will be attempting updating the PiOS to bookworm 64 bit.
[…] Installing an eRVin Software Image […]
I ran in to this issue too and worked around it as follows.
1. Connect to the Ethernet port
2. Setup SSH:
a. Download and install the Atom text editor.
b. Create and save a new file named ssh, without any extension, onto the boot partition of the SD card from another computer. When the Pi boots, it looks for the ssh file. If it is found, SSH is enabled and the file is deleted. The content of the file does not matter; it could contain text, or nothing at all.
If you have loaded Raspberry Pi OS onto a blank SD card, you will have two partitions. The first one, which is the smaller one, is the boot partition. Place the file into this one.
UN: pi
PW: ervin2020
3. VNC Setup:
a. Open Terminal
b. Type sudo raspi-cong
c. Now, enable VNC Server by doing the following:
d. Navigate to Interfacing Options.
e. Scroll down and select VNC > Yes
4. Use VNC Viewer to sign in and set up wifi.
the coachnet site has 2 versions of software, for the hardware you recommend, do I need version 2 or version 3?
John, I assume you mean the http://coachproxy.com site? If you are building your own system, as far as I know the versions on coachproxy.com are not available to you. The coachproxy.com home page directs you to the open source version on github as does my article. Start here: https://github.com/rvc-proxy/coachproxy-os/blob/master/docs/Download_Image.md
Then proceed to the Download image where there are two versions 1.1 and 1.1.1 the latest supports an additional 2020 Tiffin model. Follow the instructions and you should be fine.
If you are a grandfathered CoachProxy owner you may want to contact CoachProxy support to answer your question. However, the hardware described in my article will work with any CoachProxy version. Note that I don’t recommend the Pi4 due to much higher power demands which could impact your Firefly equipment, it also requires a beefed up version of the PICAN2.
FYI I am working on a version of eRVin that allows activation of the above coachproxy version. eRVin is a heavily modified version of CoachProxy that adds a GUI and other changes to allow easier access and is more accomodating to non-coders (like me), so you can make changes without needing to be a command line expert.
[…] your own system, or your wifi info was not pre-loaded, or does not work for some reason, please see this post for how to change it. Step 3 – Now you need to find your eRVin’s IP address on your […]
[…] Installing an eRVin Software Image […]
Hello,
I just installed the newest version. I do not see any Entegra options for configuration.
What did you use?
740 641 5881
Hi Randy, I replied via your email. The images referenced in this post have not yet been uploaded, sorry i will get to that soon!