
Tutorial: Updating an OS File & Importing a New Flow
This Tutorial walks thru an example of modifying the Shades in eRVin for a previously unsupported RV. In this case the example is for a 2014 Born Free. There are two parts to the modification:
- PART 1 – installing a new version of the window_shades.pl script in the eRVin OS that matches the hardware shade controller configuration on the RV.
- PART 2 – installing a new version of the Node-Red Shades flow to match the shade configuration on the RV and work correctly with the new widow_shade.pl script. Additionally, the old Node-Red Shades nodes need to be removed.
PART 1
This part is done from the eRVin app (aka Dasboard) and requires eRVin version 6.x or higher.
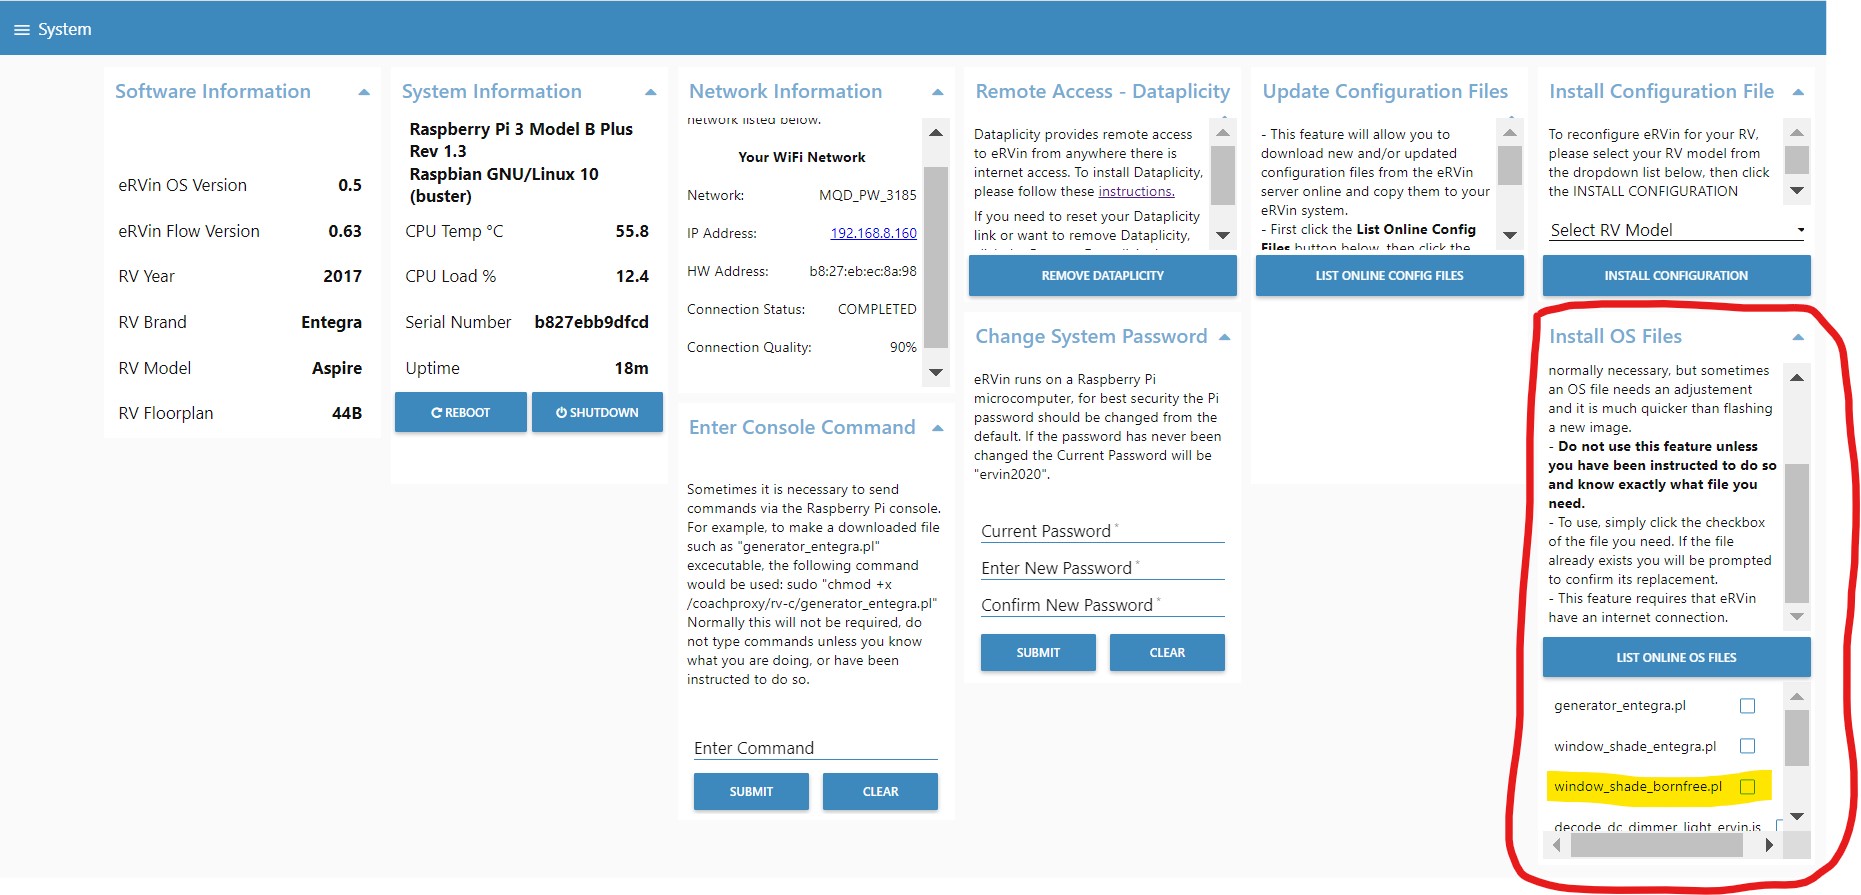
2) As highlighted in yellow above, check the box to the right of the correct file, in this example window_shade_bornfree.pl – this should result in the new file being downloaded and copied to the correct directory on your eRVin Raspberry Pi.
3) Now, we need to make the file executable. If you have eRVin v0.63 or newer proceed to section 3A. If you have eRVin version v0.62 or older proceed to section 3B (VNC) or 3C (SSH). (Note: future eRVin version 0.64 or newer will do this step automatically).
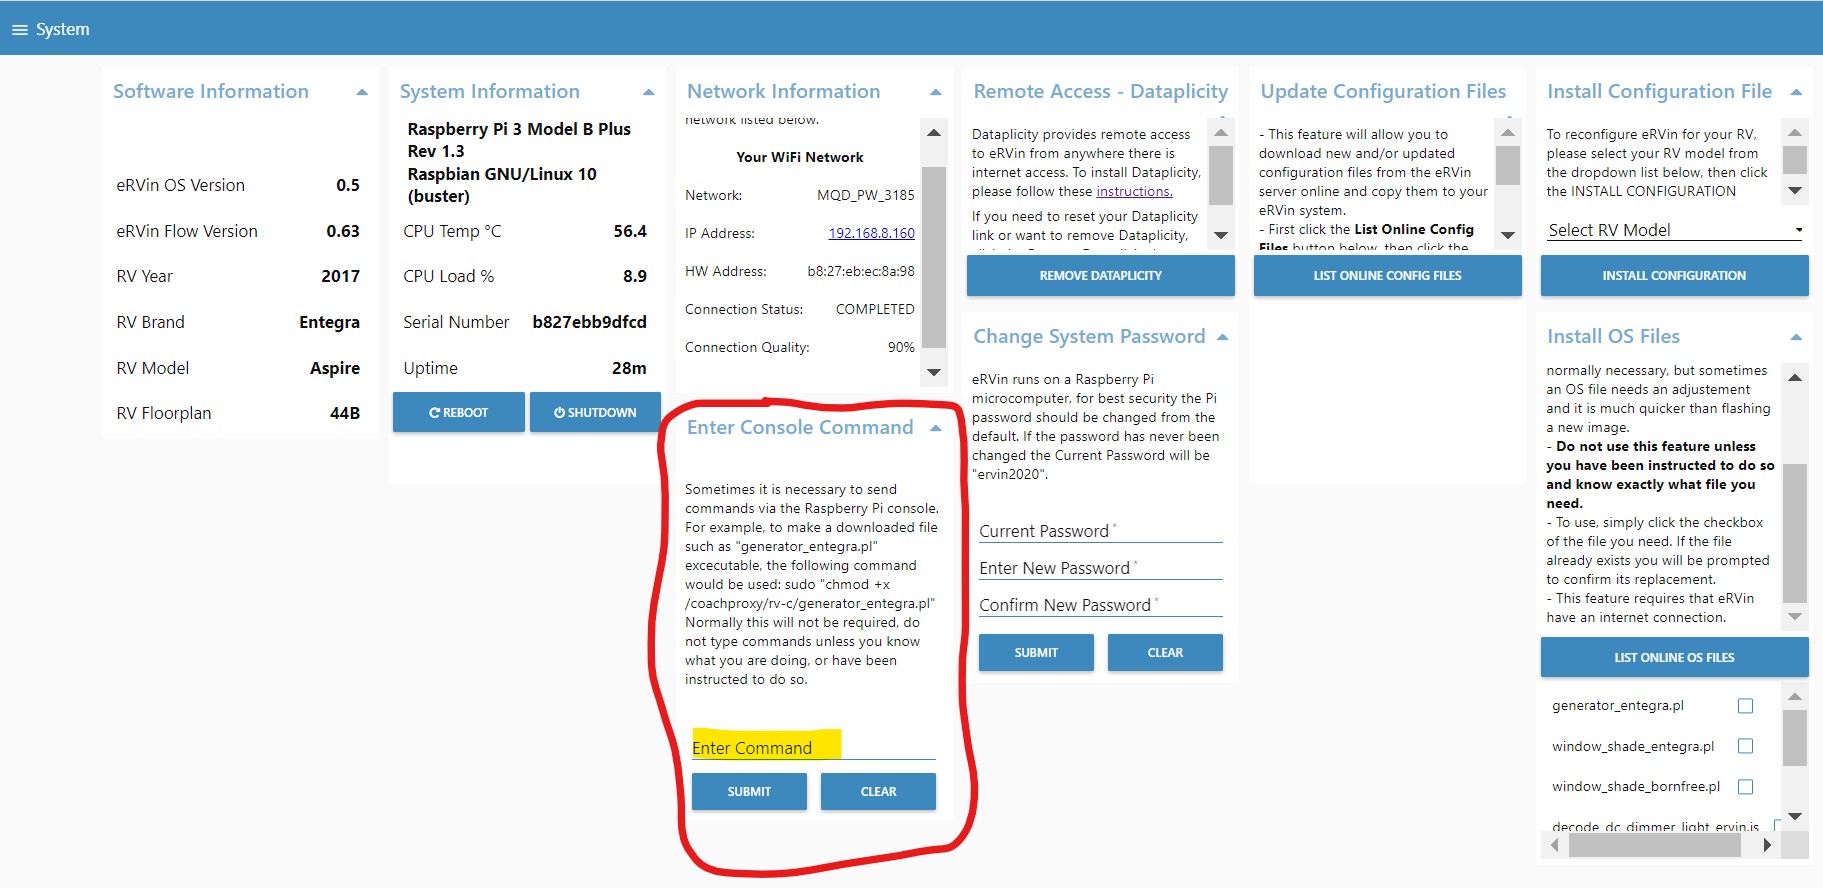
3A) eRVin 0.63 and newer has a feature that allows running system console commands from the dashboard. From the System tab, go to Enter Console Command as shown below. In the highlighted area shown, type, or copy and paste, the following:
sudo chmod +x /coachproxy/rv-c/window_shade_
then hit the Submit button. The command should run and report no errors, contact me if it does report an error.
3B) For eRVin 0.62 and earlier, it is necessary to connect to the Raspberry Pi to run the necessary command. The steps below describe the process using VNC to virtually connect to the Raspberry Pi desktop.
-
-
- Using VNC connect to the eRVin desktop. See this tutorial for help.
- Open a terminal window by clicking the icon shown below:

- In the terminal window, copy and paste, or type the following, then hit enter:
sudo chmod +x /coachproxy/rv-c/window_shade_bornfree.pl
Make sure there are no errors.
-

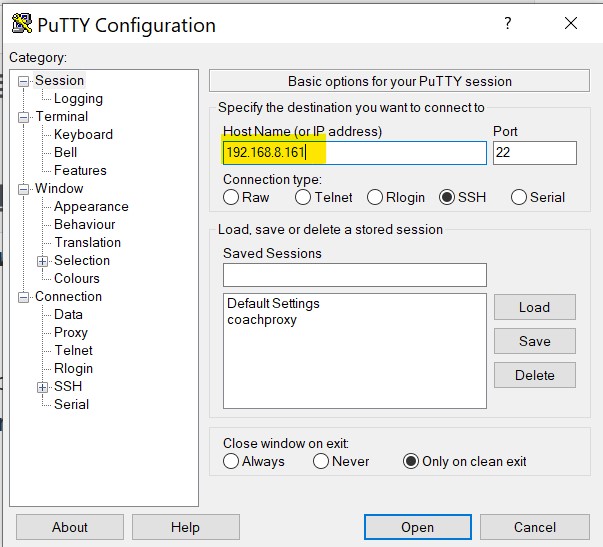
3C) It is also possible to do this step via SSH using a PC or Mac app like PuTTY or similar. The example shown below is using PuTTY:
-
-
- Open the PuTTY app and enter your eRVin IP address in the field as shown, then click the Open button.
- A terminal window will open and you will be prompted for the user id
which by default is pi. Type that in and hit enter. - Next you will be prompted for the password which by default is ervin2020. Type that in and hit enter.
- Now simply type in the command below and hit enter:
sudo chmod +x /coachproxy/rv-c/window_shade_bornfree.pl
- Open the PuTTY app and enter your eRVin IP address in the field as shown, then click the Open button.
-
 which by default is pi. Type that in and hit enter.
PART 2
This part requires working in Node-Red, if you have never done that before and need an introduction, please see this short tutorial.
1) OK, so now we have the updated window_shades.pl script installed, we need to update the Node-Red flow with new shade buttons. The new flow can be downloaded from here. To update the Shades flow for a 2014 Born Free, the file to download is v063_WindowShades_2014_BornFree_PaulC.json. Save it to a convenient directory on your Mac or PC.
2) 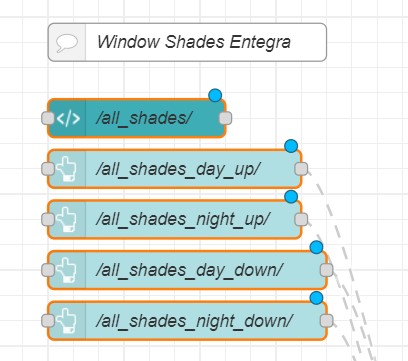 Now we need to delete the old shades flow. The Shades flow in eRVin 6.x and older is in the Main tab. A closeup of a few of the shades nodes is shown to the right, The graphic below shows part of the nodes that need to be deleted. Delete all the nodes inside the red lines, plus the other light blue shades nodes that go off the screen at the bottom. You can delete each node individually, or select them in groups by dragging a box around them, then hit the delete button.
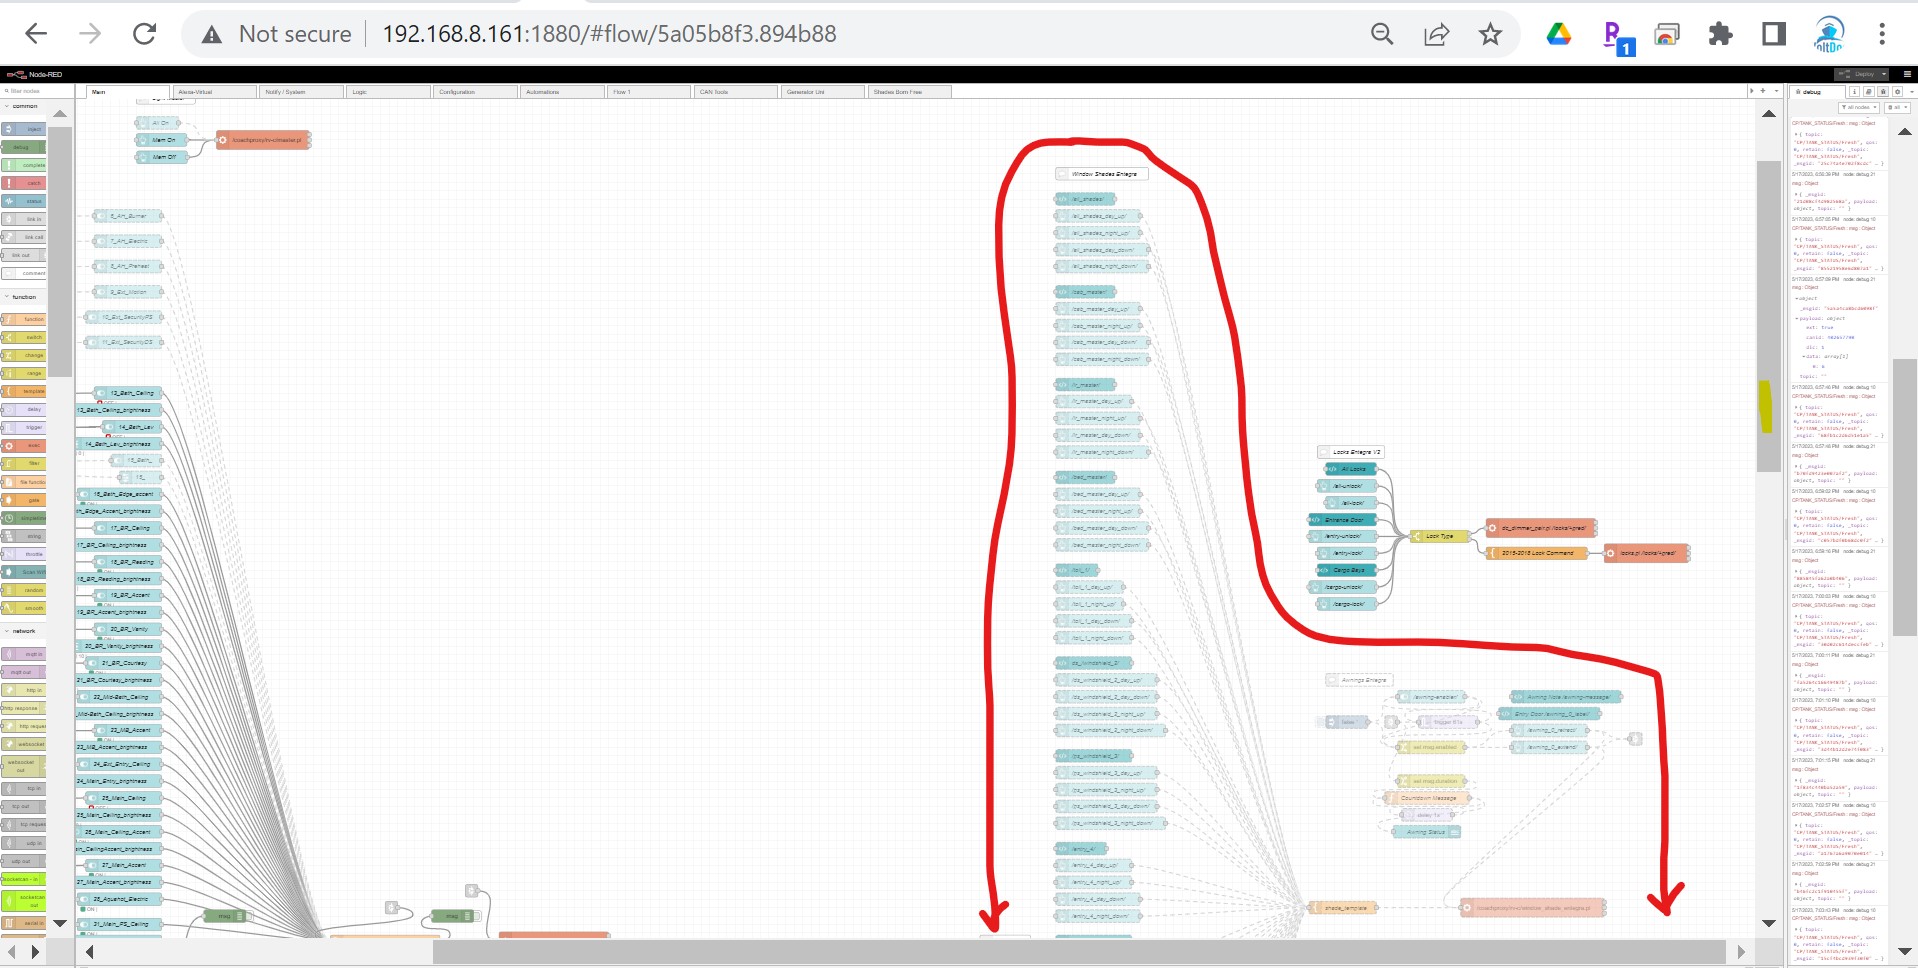
3) Instead of putting the new Shades flow back in the Main tab, we are going to put it in its own dedicated “tab” for future ease of modification. As shown in the image below, click the highlighted + button. This will add a new empty tab at the top of the palette.

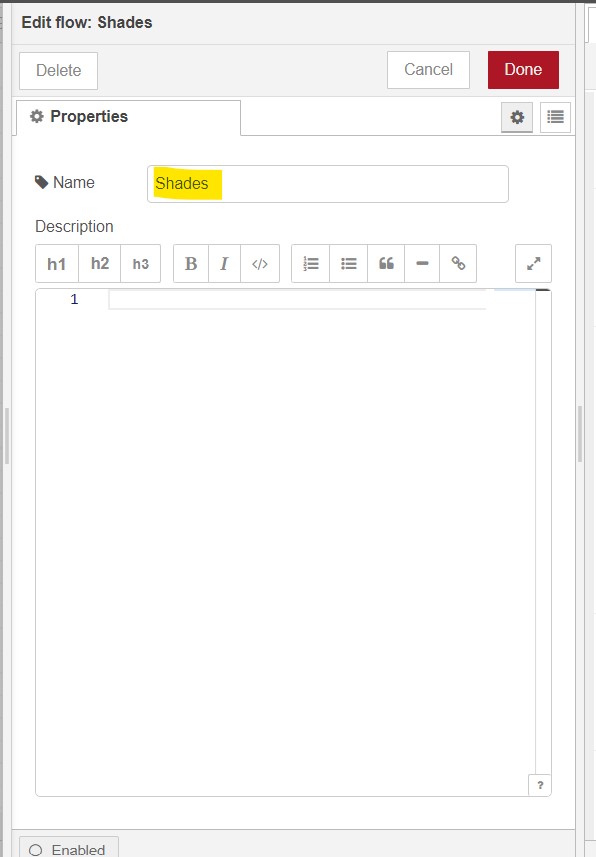
4) Double click the tab and rename it to Shades as show below, then click Done.
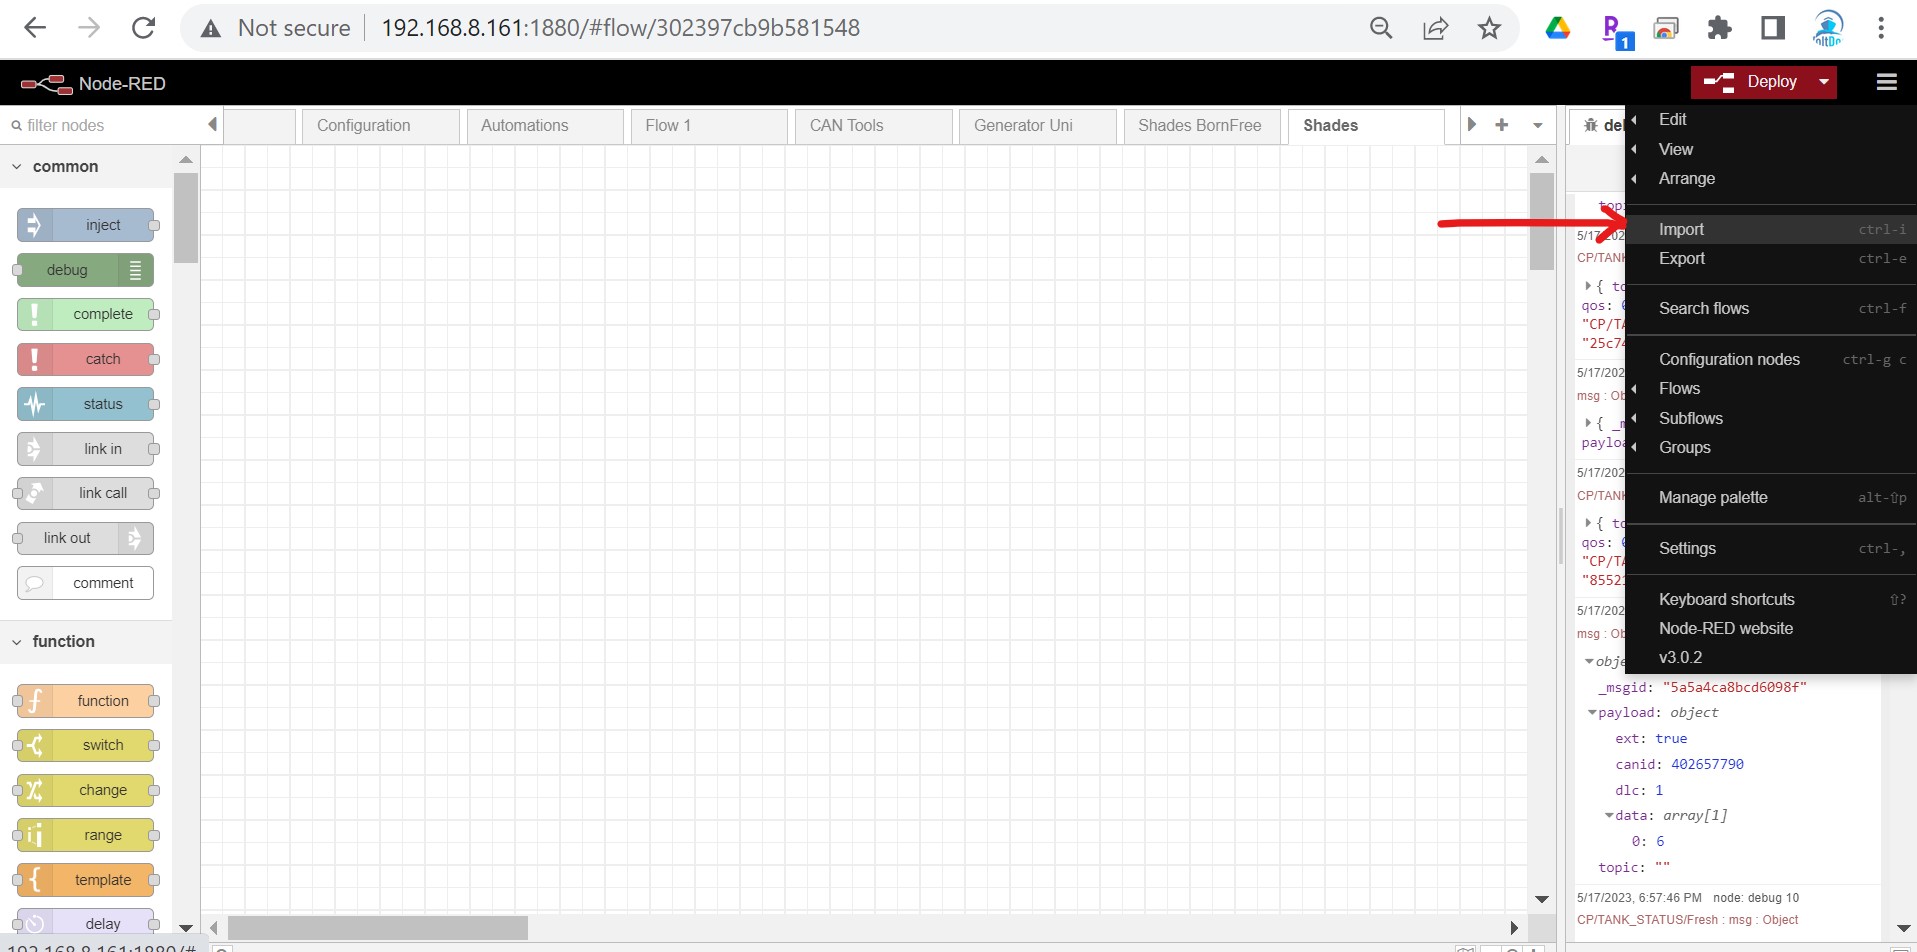
5) Now, while still in the new Shades tab, select Import from the hamburger menu to the right of the Deploy button as shown below:
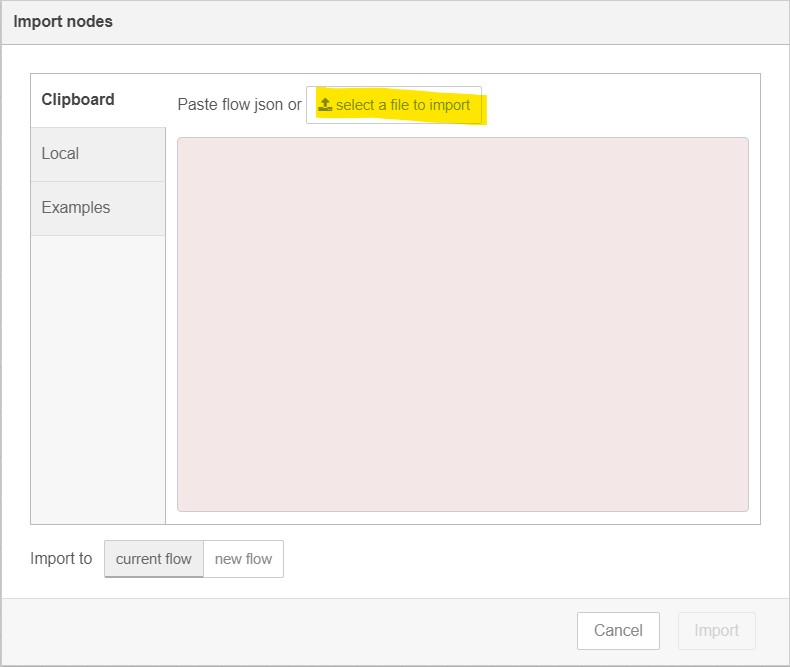
6) As shown below click select a file to import and choose the file that was downloaded to your Mac or PC in PART 2 Step 1.
7) The new flow should import and will look something like this.
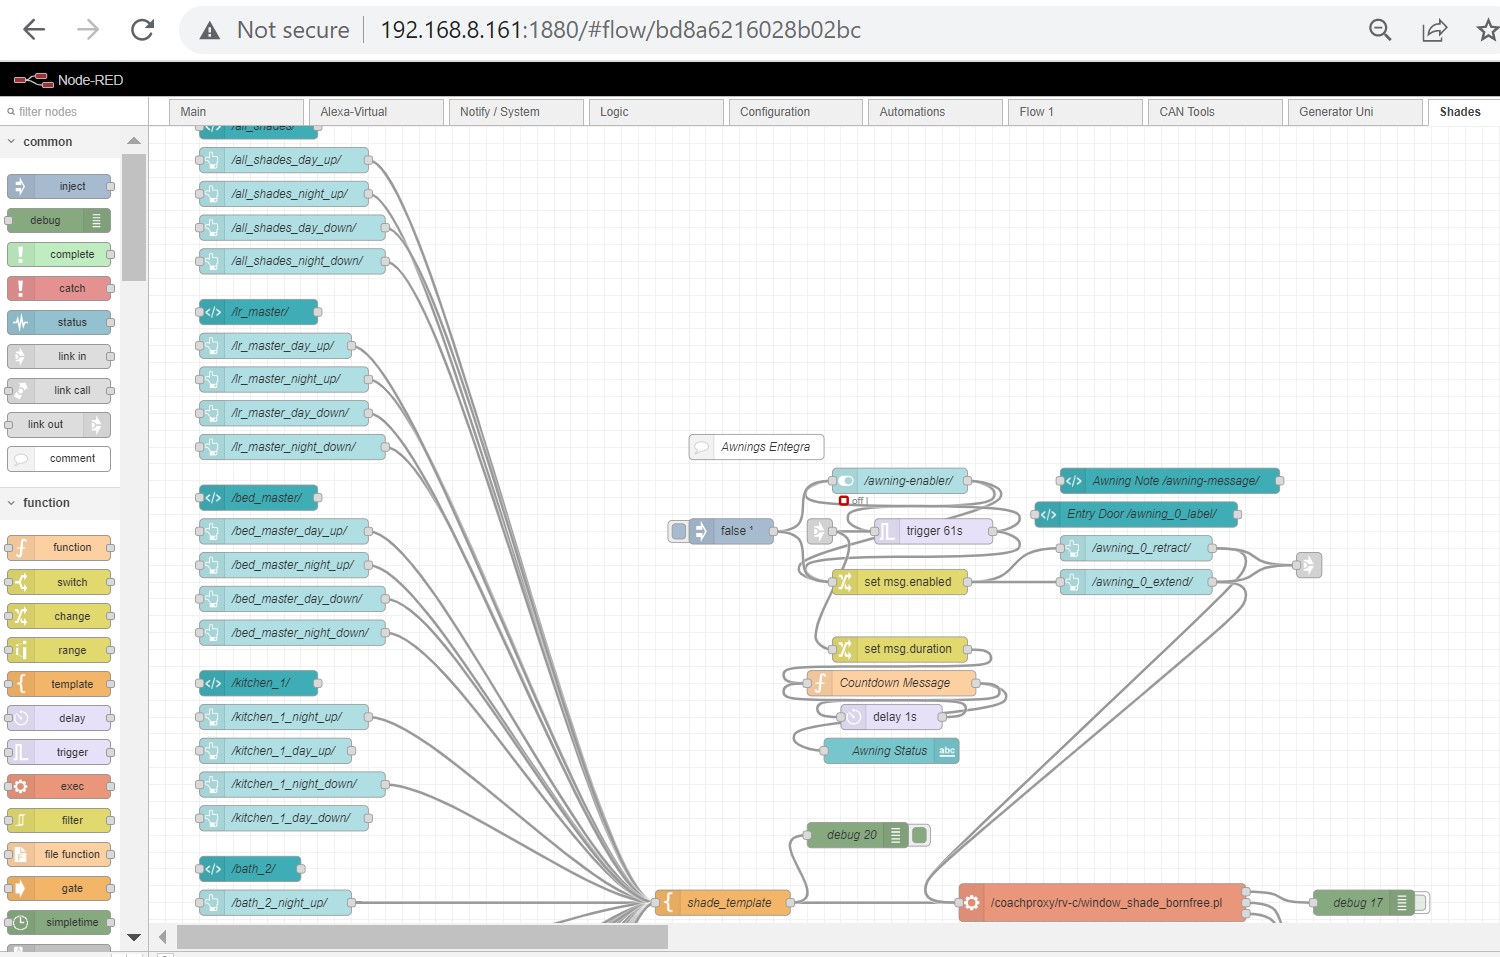
8) Now click the Deploy button to save your changes and try out your shades!
Richard
I know I’m trying to put a square peg in a round hole, but I’m attempting to use this on a 2023 Airstream Interstate 19 with a Firefly G12. It’s a 19′ van, so there are considerably fewer devices to control. I’ve configured all of the lights, and they’re working correctly. There are only four shades, and three of them are working. They are numbered 1, 3, 4, and 5. It’s number 5 that will not work. I threw some debug nodes in, and verified the payload matches the other shades with the exception of the number, and that the number is correct (5). Using your instance scanner, I’ve verified that the Firefly control panel calls shade 5. However, when I try it from eRVin with the instance scanner running, it shows up as shade 9. There is no shade 9. I have some other issues that I’m attempting to work through, but this is the one that has me baffled. Do I need to install a new version of window_shades.pl? If so, which one should I try, since I know none of them are for my rig? Thanks.
Steve,
I see that this post is almost 2 years old and wondering how far you are with using RVin for controlling your 2023 Airstream? It looks like that model has many of the same systems as my 2022 Coachmen Beyond (Truma Combi/Truma CP controler(and probably a Firefly Bridge module back to the G12), Xantrex, G12 power panel and Firefly display, etc……..I am just starting a RVin build and wondering if maybe you have already an RVin image/? that I could build off of? (will gladly compensate you and collaborte with you on my efforts…..FYI Rob-I donated to this page as well).
Marty, thanks so much for your donation! That is greatly appreciated!
I don’t have any info regarding your rig, however I have some, as of yet posted information regarding how to send and receive RV-C packets directly from the Socketcan contrib in Node-Red, if that is of any interest.
Also I recently found out from another eRVin user with a 2023 Entegra that his Firefly equipment lets him display a list of active RV-C DGN’s directly. That’s a great capability but I don’t know if it’s available on all Firefly systems.
Email me if you have any specific questions.
To clarify my previous post:
I have a 2018 Cornerstone 45B and am running the 2017_Entegra_Anthem-CS_44B_v_0.62 image.
The 2018_Entegra_Anthem-CS_DEQ_v_0.51 will not work, because it is the wrong floor plan.
I am looking for an image for a 2018 Anthem-CS_44B or some help modifying the image for the 2017. The 2017 will run some of my system, but not all. There are some things missing and some do not work. For instance the AH diesel works and the electric gets the command, but it is invalid. Also the floor heat is missing. Couple of the lights and the shades need some work.
I have looked at the flows and used the troubleshooter but am unable to see how to correct the problem. Is there something I can do or is there an image for the 2018 Cornerstone 45B?
I loaded the software on the raspberry pie, I tried to update from the 2017_Entegra_Anthem-CS_44B_v_0.62_ to the 2018_Entegra_Anthem-CS_DEQ_v_0.51. When my raspberry pie reboots I cannot sign on and have to re-image. I have done this several times. I have to re-image a sim card and start from scratch each time. Looking for suggestions.
I did not see a better place to post this. I am running “2017_Entegra_Anthem-CS_44B_v_0.62_beta” and from a shell I can execute “generator_entegra.pl 3 1” from a command line and the generator starts perfectly but it does not do anything from the GUI. Do I need to modify node-red in some way to pass the version value of 3 for my 2017VT Anthem? If so, where is that added or set in the code as I can not find it. I am so close!
Steve, yes, the original coachproxy generator code has hard-coded values that won’t work for many coaches. But, if you can get it to work ftom the command line one of the nodes in the flow is probably configured incorrectly.
Just so happens I rewrote the generator flow recently so the end user can supply the necessary parameters to work with any coach.
You sound fairly comfortable with node-red(??) If I send you the new flow are you comfortable with importing that? Or do you need a little guidance? You will also need to delete the old generator flow. And you will also need to update the generator perl script, but that is fairly easy. I’ll put something together for you tonight or tomorrow.
I will email this response as well, so you have my email.
Yes i ha e pomed around in node-red and i can import the new flow!
Yes i ha e pomed around in node-red and i can import the new flow!
The comment was pretty bad! Yes I have poked around in node-red and i can import the new flow! Embarrassing…
LOL! Gotta love auto correct!
I fixed this by creating two bash scripts, one to start the gen and one to stop it. The bash script calls the perl script with the correct command line switches. I modified the nodes to call the bash scripts instead of perl. Obviously, this will all break on the next release so its a temporary solution. If you send me your email address, I will share this type of thing with you as I develop it and you can decide whether to publish it or not. I’m also curious if chassis voltage or ignition position works for you? I have been all through Node-red and found a perl script to read all the values from the Can bus and I don’t see chassis voltage even being exposed.
Steve, good for you! Although I will send you another alternative as soon as we can get email working. I sent you two emails on 6/30, one about 10am, another about 6pm. They were sent to a ***@me.com address. Did you not get those?