
Tutorial – How To Change Lighting Instances in eRVin
For eRVin (and CoachProxy) users trying to adapt a non-supported coach, one of the most common questions is “how do I do some basic modifications so things will work on my coach”? This tutorial will describe how to modify the lighting configuration in Node-Red, which should provide a good intro to working with Node-Red, as well as to get your lighting working.
About Instances:
All lights in an RV-C equipped RV use the same RV-C command (aka “PGN”) but have “instance” identifiers to distinguish between individual lights, basically just a number. RV-C instances are analogous to the channels on a TV set, you only have one TV but it can display many different channels. For this exercise you just need to figure out the “instance numbers” (aka channels) specific to the lights on your RV.
Usually, you can find the instance numbers for your lights printed on the front of the Spyder/Firefly panels. Typically on Firefly/Spyder equipment that I am familiar with this is a number between 1 and 60, but it could be anything between 1 and 255. Below is an example of my Firefly G6 panel:

Note the lights are numbered from 13 to 47, those numbers are equal to the actual RV-C instance number. About 2/3 of those lights are labeled “DIMMER” and the rest “RELAY”. The DIMMER channels allow on-off and dimming of a light, the RELAY channels provide on/off only. Note in my case, there are several unlisted (and therefore unused) channels – 15, 28, 40, 41, & 48. In addition, 36 – ENT CENTER ACCENT and 47 – MOTION SENSOR STATUS don’t actually have anything connected to them. All of these can be used for other purposes such as controlling another device like an Aquahot. However, the newer rigs I’ve encountered are unlikely to have any unused channels.
In the above example, the instance number for my BATHROOM LTS is 13. Some of the newer Firefly/Spyder systems, like the G12, may not have the instance numbers printed on them, so you may need to seek other sources. If you already have an LCD panel from which you can control the lights, there is usually a screen that lists the instance numbers. Or you may have a printed sheet somewhere. Failing that, eRVin 6.0 and up has a small utility that will pop up the instance number on the eRVin dashboard when you turn a light on or off. This is located under options and is called Detect Lighting Instance.
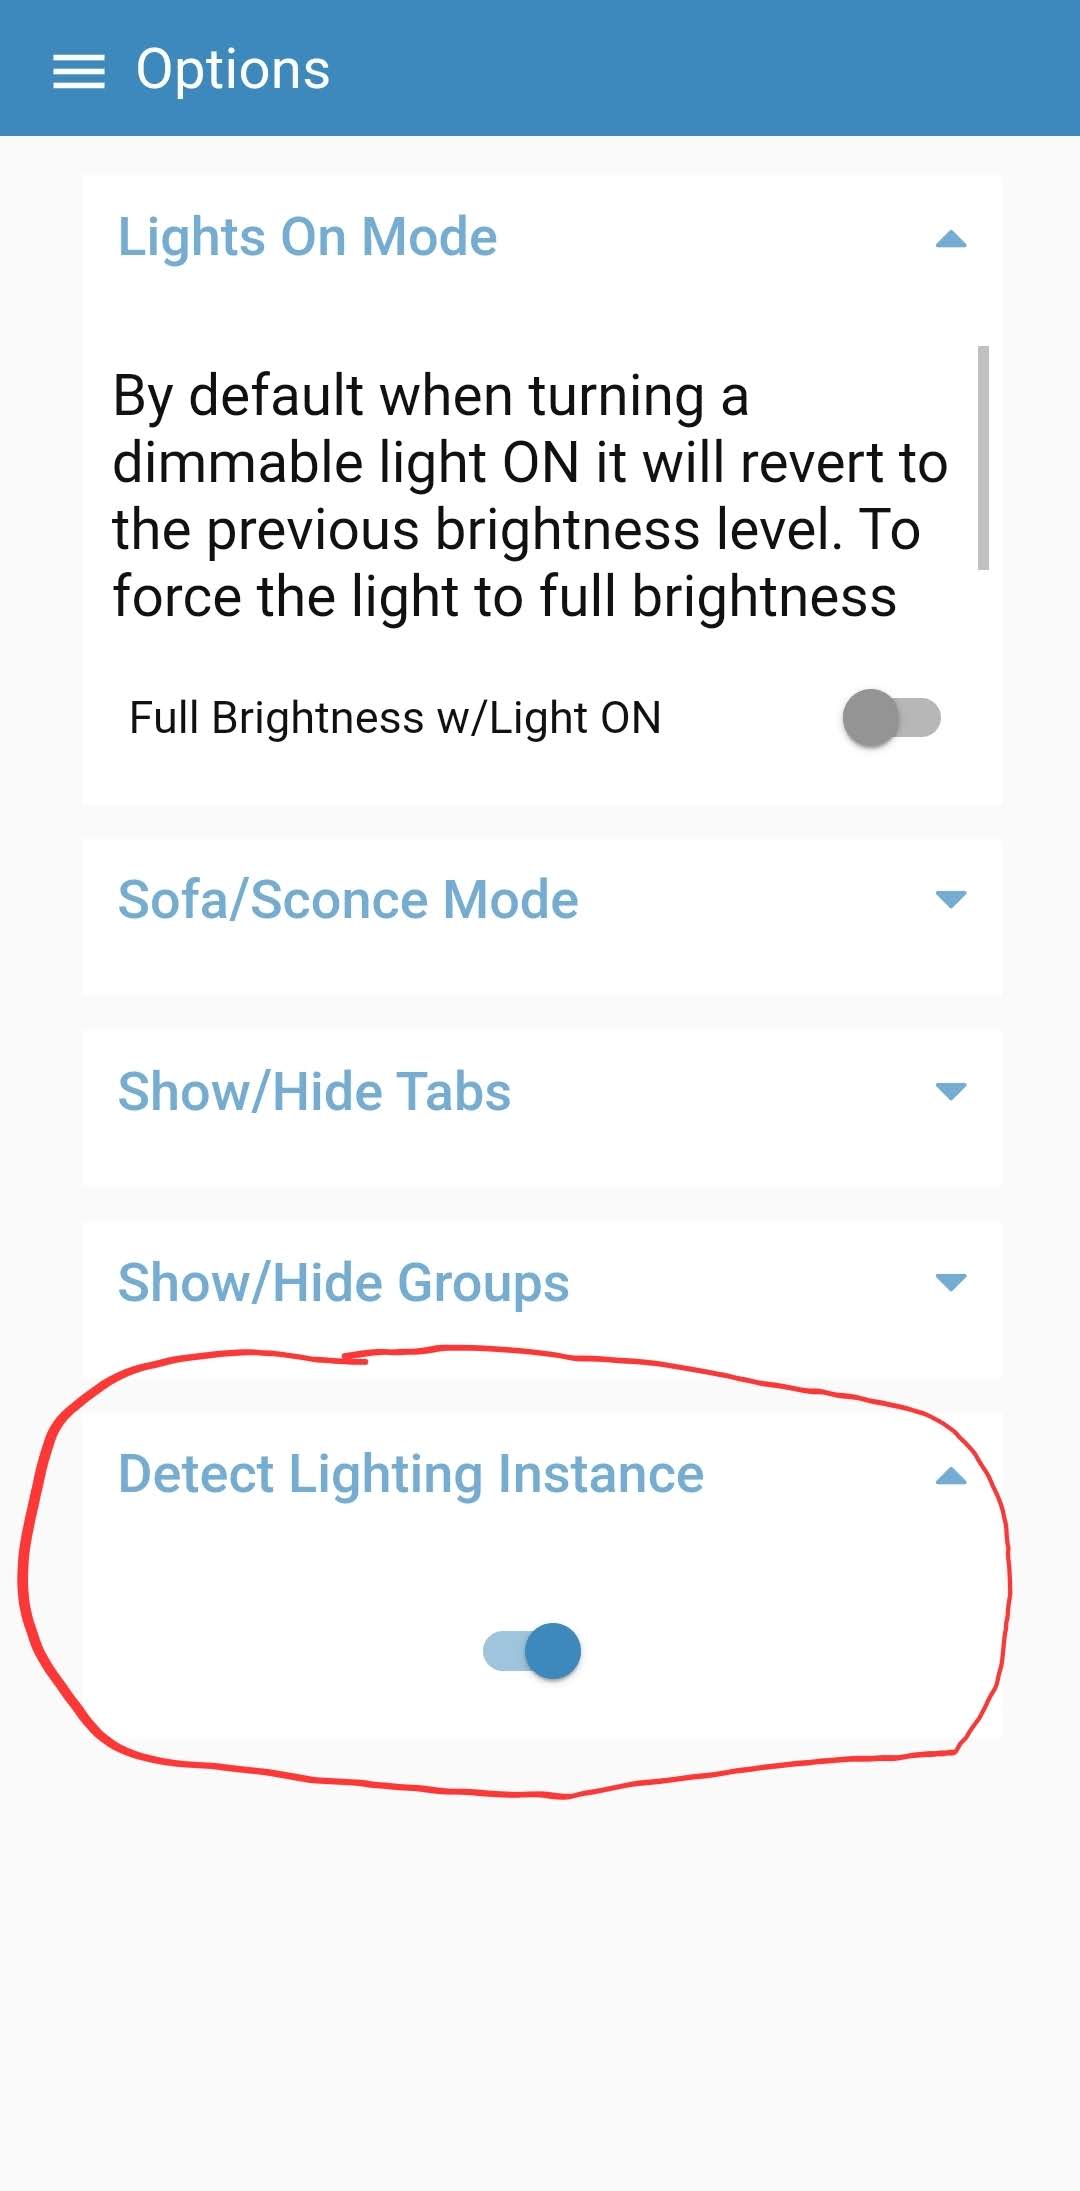
To use it, Turn the switch on, now press a wall switch for a light or shade and a popup on the dashboard will report the command and instance number.
Connect to Node-Red:
To get started modifying eRVin for your RV, first you will need to access Node-Red. Do this from a browser of your choice on a PC or Mac connected to your local LAN. Don’t try to access Node-Red from a browser on the Raspberry Pi itself, the performance is very poor if you do it that way. If you have never connected to Node-Red before, see the Accessing Node-Red Flows tutorial. If you already have some experience with this, just type (http://your.pi.ip.address:1880).
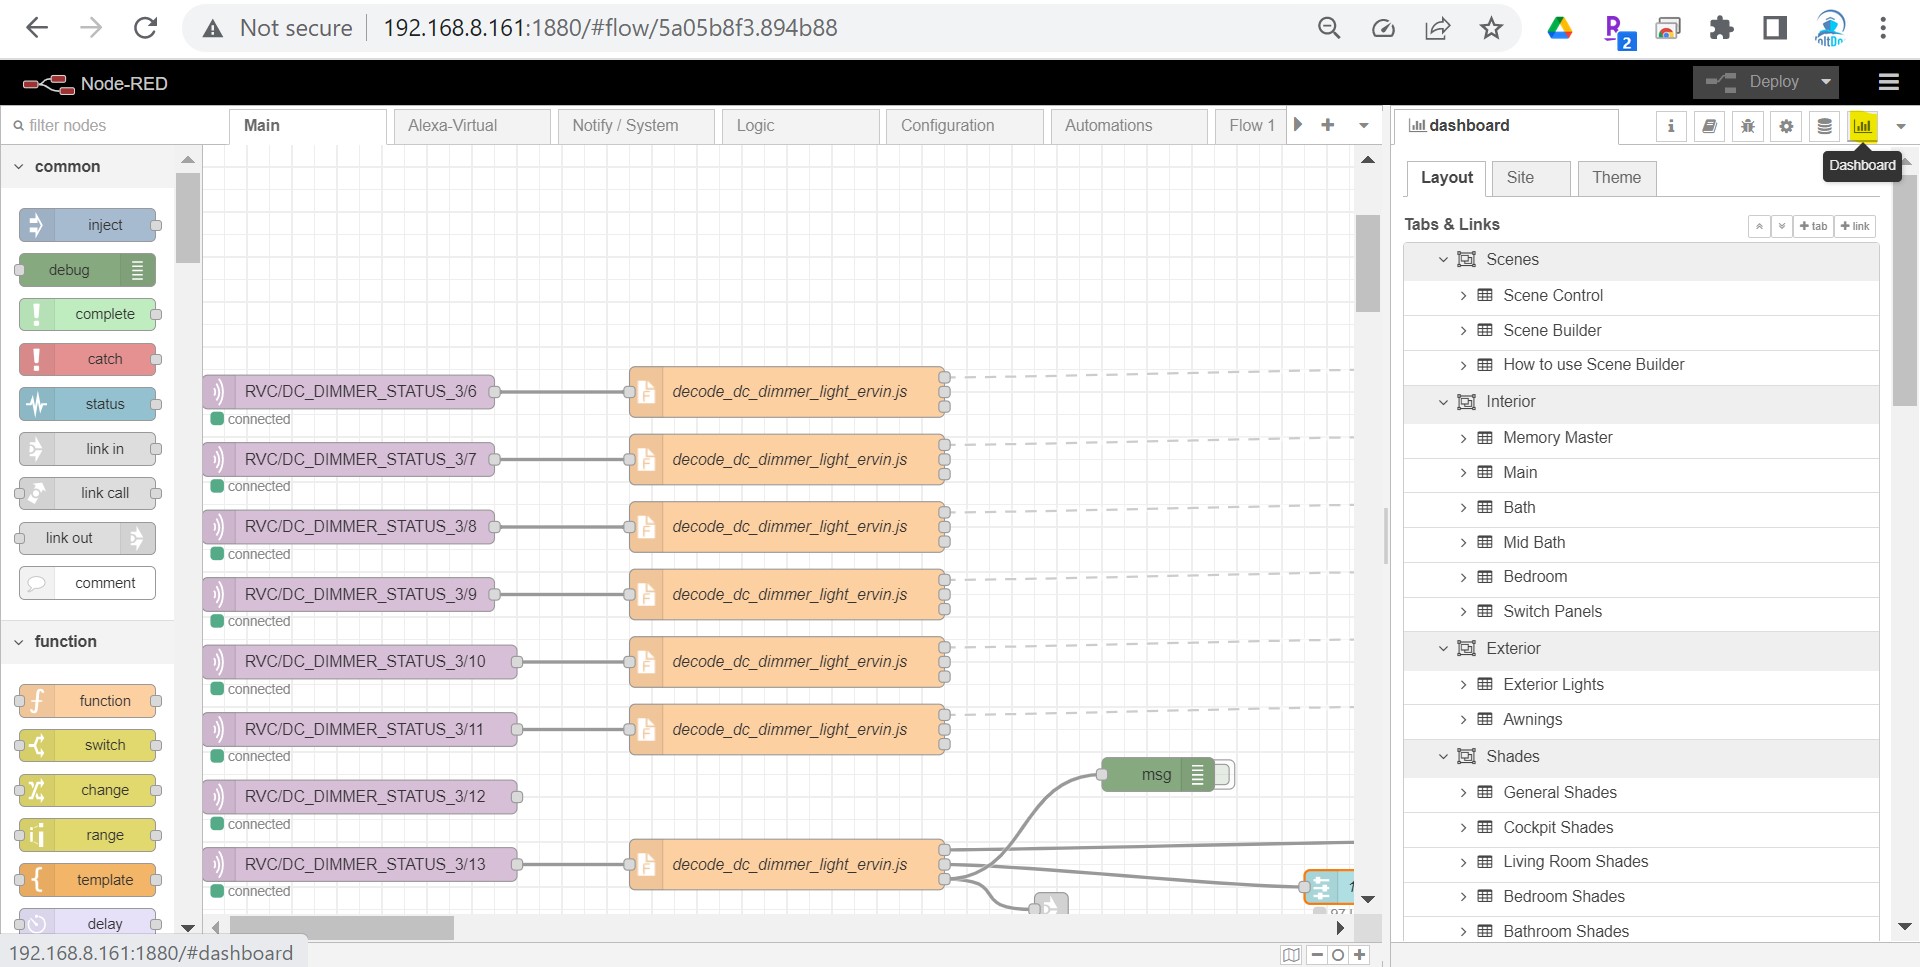
After Node-Red loads, you will be connected with a colorful screen, this is appropriately called the Palette. Note the “tabs” along the top, each tab will contain one or more “flows” (programs). The lighting flows we are looking for in this case, are in the Main tab. The colorful ovals on the palette are the nodes. There are many kinds of nodes that do different jobs. To pass information from node to node, they get “wired” together just by clicking and dragging a line between them.
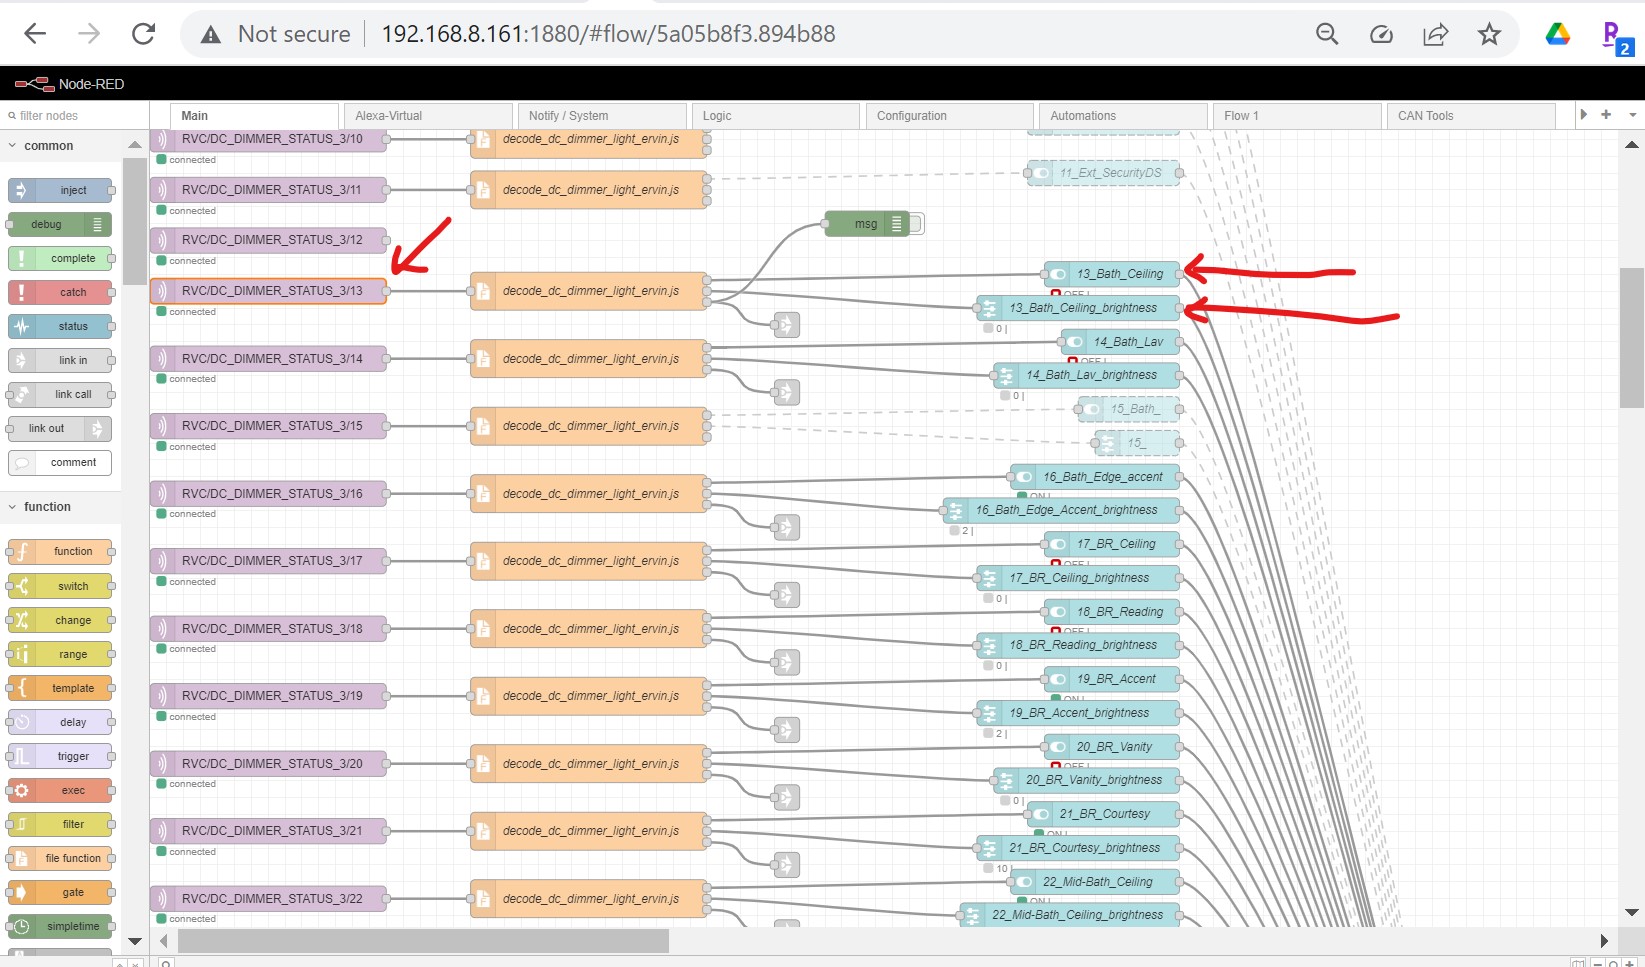
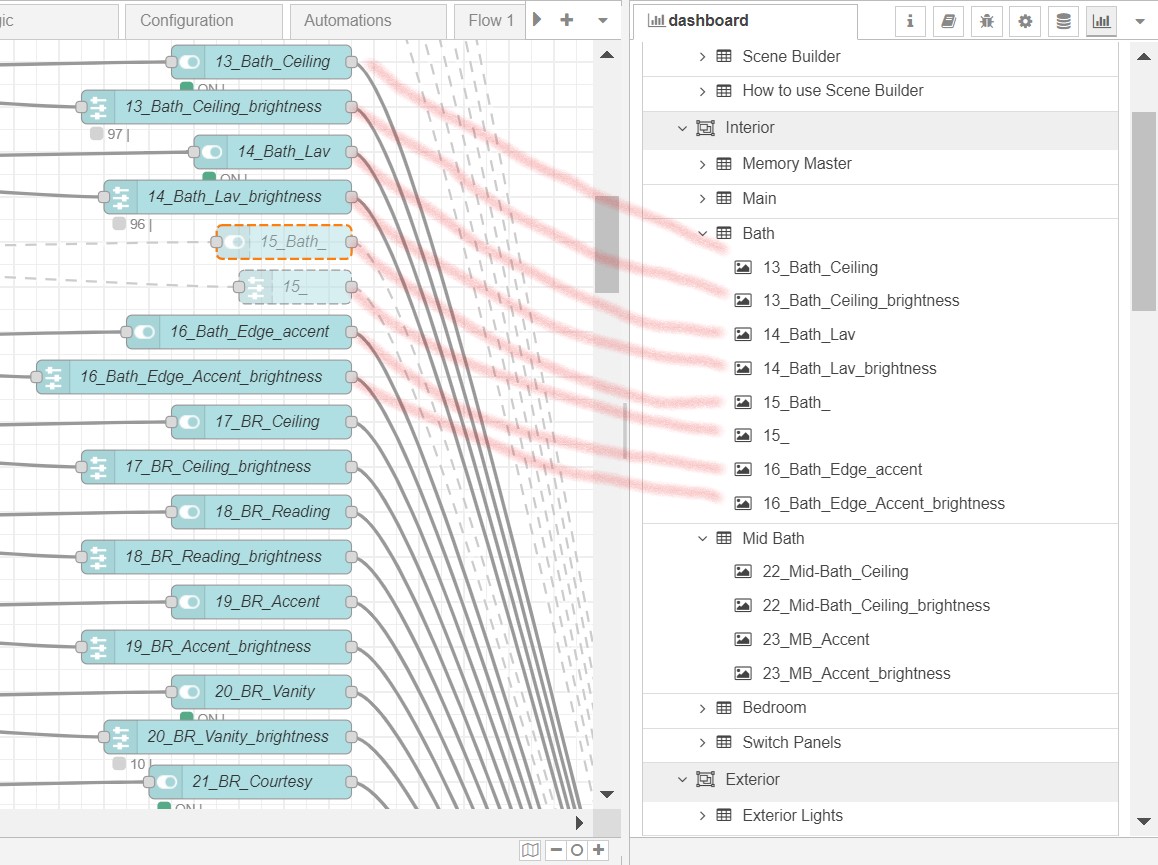
Note that here are are a series of 3 or 4 nodes repeated for each lighting instance. Below is a representative view from eRVin v0.6x. The three red arrows represent the nodes that need to be modified for each lighting instance, in this case instance 13, my bath ceiling light, which is dimmable.
The purple nodes on the left are MQTT IN nodes, they pick up status info from the RV-C network. They pass this info to the yellow nodes which are FUNCTION nodes, these contain some javascript programming that does some custom processing. The output of the FUNCTION node connects to the blue nodes furthest to the right, which are the physical buttons and sliders you operate from the eRVin “dashboard”. The top blue node is a BUTTON node, the other is the SLIDER node. Finally, the blue nodes connect to another FUNCTION node that does some more processing and finally to an EXEC node which sends the actual command back to the RV-C network.
Let’s Change Some Instances!
So lets get started modifying some nodes so they work with your lights.
1) Double click the purple MQTT IN node it to open it.
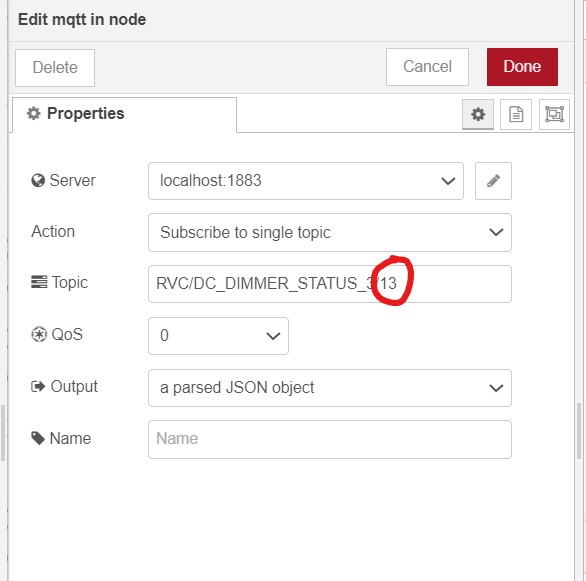
For this example, the instance number is 13, shown circled in red above, so that will be changed to match the instance of one of your lights. Click Done when finished.
The two light blue nodes are the dashboard nodes. The upper node is a BUTTON aka switch. The lower node is a SLIDER for the dimmer. Instances for RELAY ports are not dimmable, so will not have the slider node and will be setup as shown below. For non-dimmable lights you can just delete the slider node:
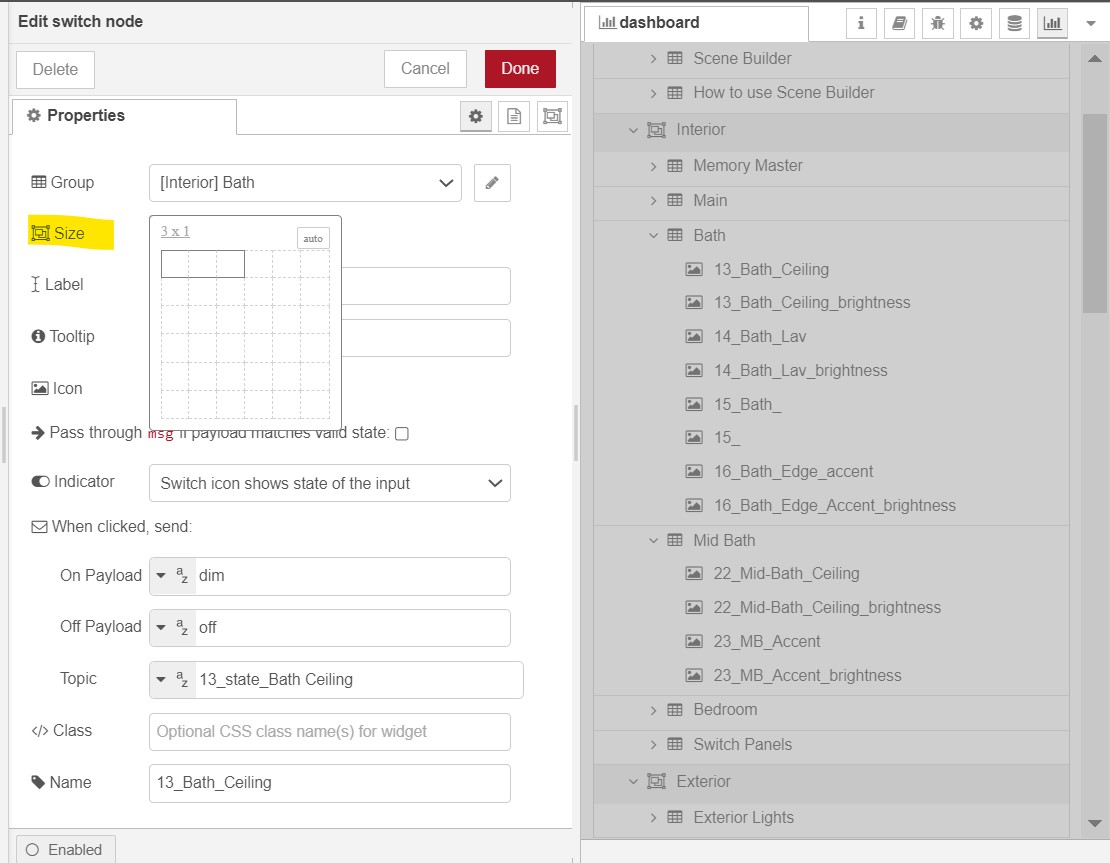
2) Ok, lets double click the upper light blue node for the button (light 13 in my example). There are several changes to make in this node.
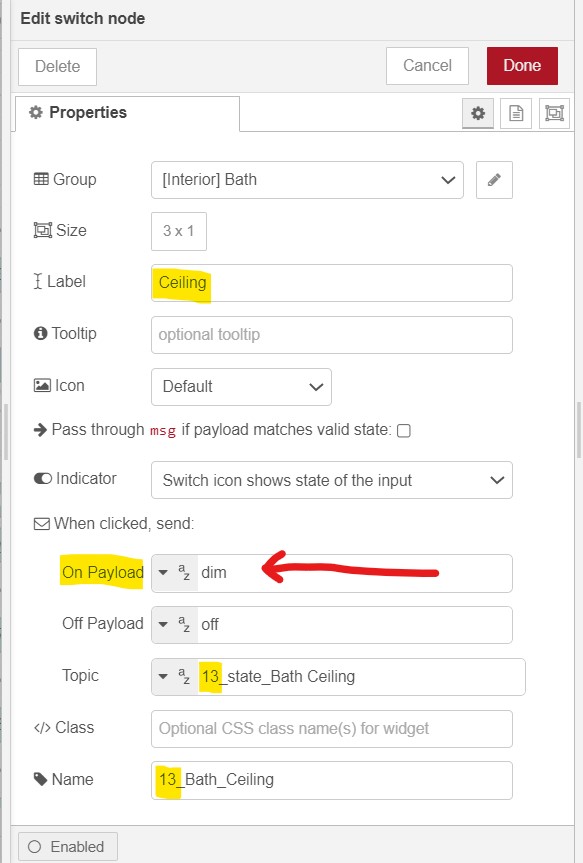
The Group at the top is where this light shows up in the dashboard, in this case it is Interior/Bath. You may need to change this depending where you want your new light to be listed in the user interface dashboard – more on this later. Click the down arrow to see a list of all the currently available groups. It is possible to add new groups or delete them.
The Label is the name of the light, in this case the Ceiling light in the bathroom. Change to suit how you want the name to show up in the user interface dashboard.
The On Payload differentiates between a DIMMER and a RELAY. If your instance is dimmable, the value pointed at by the red arrow should be dim. If the instance is not dimmable, the value should be on. Of all the settings, this is the most important to get right.
Under Topic change the 13 to whatever the instance number is for your light. It must be the same instance number as the MQTT IN node.
Under Name change the instance number to match – this is mainly used for reference so you know which node is which instance.
Click Done .
3) Now lets move on to the Slider node. If your instance is a RELAY (not dimmable), no need to change this node, you can just delete it.
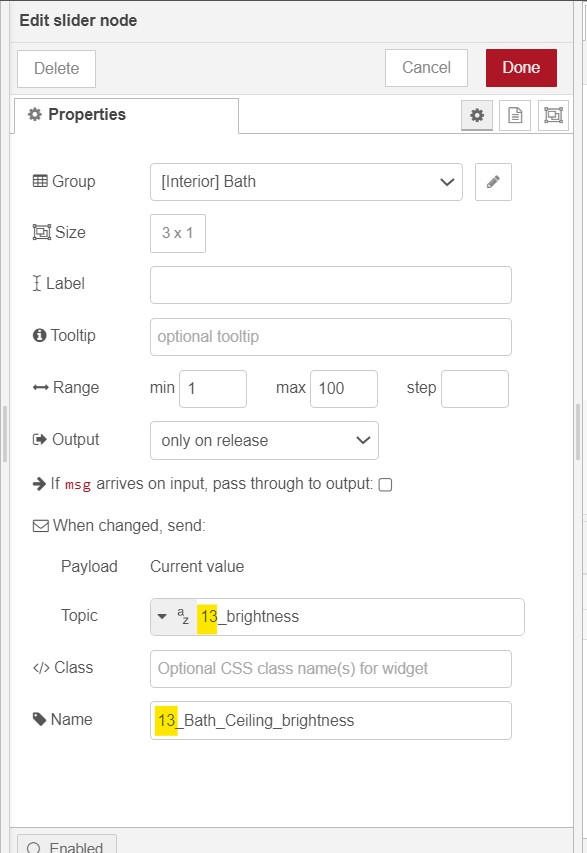
Adjust the Group to match the Button node.
Change the instance (13) for the Topic and Name.
Click Done .
At this point you should have successfully modified one lighting instance. The next step will be to activate the changes you just made.
4) In the upper right corner of the Node-Red main screen, the Deploy button should have a red background – this indicates changes have been made, but not saved. Go ahead and click Deploy . In a few seconds you should get a popup that indicates success.
Now go to your eRVin user interface dashboard (http://<your.pi.ip.address>) and see if the light you modified now works as expected. If so, great! Go ahead and modify the remainder of your lighting instances.
A few tips:
- If you need more lighting instances, just copy and paste the entire series of nodes and wire them up like the others in the flow (you can select multiple nodes all at once by dragging around them or CTRL-click. You may be able to use any existing Disabled nodes (greyed out) if they are present (see next section). If you have extra instances left over, you can just delete them, or if you prefer, they can be Disabled (see next section).
- It is probably easiest to modify all your dimmer nodes at once, then go back and modify the relay nodes. If you need to add more nodes, copy an existing dimmer and paste as needed where you need a dimmer. Likewise copy an existing relay and paste as needed where you need a relay. That way there will be no need to modify the On Payload field.
- For Relay instances you can just delete the SLIDER node, but you MUST ensure the ON PAYLOAD value in the BUTTON node is set to on and not dim.
- Don’t forget, your changes are not saved until you do a Deploy . It is a good idea to do this every so often just in case your system crashes.
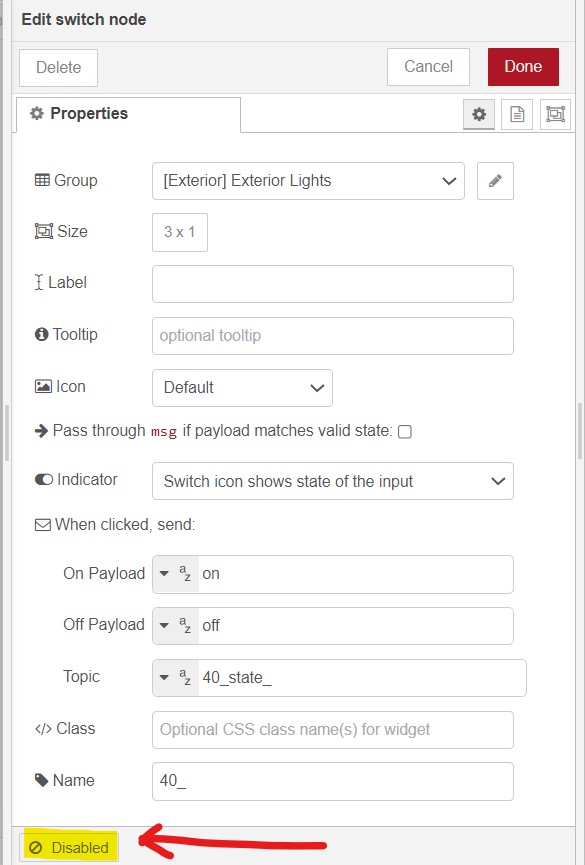
Enabling/Disabling Nodes
Some of the eRVin configurations may have pre-programmed nodes in the lighting flow that are Disabled. The reason for this is to make it easier for to make modifications. These nodes will show as greyed out (dimmed). If you want to use these, they can easily be re-enabled. Just open the node and click the button shown below:
Dashboard Setup
Once you get going on this you may have some issues with controlling how the buttons and sliders appear. It can be a little confusing, but the best place to fix that is in the Dashboard controls:
From the upper right corner beneath the Deploy button, select the Dashboard icon, it may be hidden, so you will probably need to click the down arrow and select Dashboard. Here you can see the layout of the dashboard tabs (such as Interior) and groups (such as Bath). You can drag the groups and tabs around so they are in the order desired. After you have played with it a bit (make a change, Deploy, see what happened), you will get the hang of it.
The graphic below shows is intended to show that the button and slider nodes in the flow are one and the same with the items listed in the Dashboard panel. Double clicking on the node, or clicking the edit button next to an item in the Dashboard panel, will bring up the exact same window.
The order of the nodes in the palette window doesn’t matter, however, the order (and some other settings) in the Dashbord panel will affect how the buttons and sliders appear on the actual user interface. Generally the order should be as shown above with the slider just beneath the button of the same instance. Just drag them around as needed:
Sometimes you will need to mess around with the Size setting to get things to line up. By default in coachproxy and eRVin, the buttons and sliders have a 3×1 grid setting in the dashboard panel as shown below:
The way this actually translates to the user interface is shown below. The button has a 3×1 grid and the slider has a 3×1 grid so they get displayed on the same line (the total grid width is 6 spaces wide) and this works out neatly.
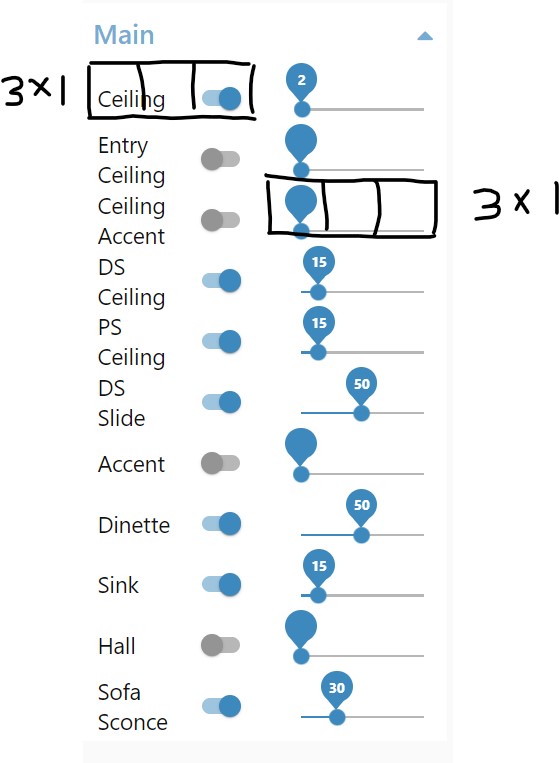
But what happens if you have a button plus its slider, then the next line is a button only. And the line after that is another button plus slider? This will knock the alignment off for everything after the button with no slider. The way to fix that would be to change the size of the button without the slider 6×1. Alternately, you could move all the single buttons to the bottom or top. You could also try using Auto.
Hopefully, this has provided a good intro and you were able to get some lights working. Please comment below or email me if you have suggestions or questions.
I have a system with a G12 panel (2023 Pleasure Way Ascent TS). I’ve tried using the detect lighting instance, but nothing pops up when I turn a light on/off. Then I discovered the instance numbers are on the LCD screen for the system. However, when I change the lighting instance numbers, nothing happens (yes, I’ve deployed the changes). It does display a red ON/OFF under the light blue nodes when I make the changes. Any suggestions?
No, I’m sorry, no idea what you are describing. Your system may be using another DGN for some reason. Assume you are talking about lighting? The mini instance detector only detects DC_DIMNER_COMMNAND_2 DGN for lighting commands. Your vendor might not be following the RV-C spec and are using some other proprietary variant? It gets a lot more difficult if the spec is not being followed and there is no documentation. You could try using MQTT Explorer and try to see what DGN is being used. But that will only work if the DGN is a valid RV-C DGN and is defined in the deployed mqtt2rvc YAML file. Sorry I can’t be of more help.
Rob,
I am working on a 2014 Born Free and have a Pi4. The v0.5 doesn’t work and the v0.6 only has two coach options that don’t mirror my rv what so ever. I can get the bathroom light to work and a few of the shades…how do I modify everything?
cid:422CFC7B-A328-4274-B9A7-1E585025B3E4
Paul, can you send a photo of your Firefly panel? I’ll send you my email address separately.