
Adding GPS to your eRVin System
Adding a GPS Receiver to eRVin
Adding a GPS receiver to eRVin is very straightforward, especially for eRVin version 0.3 and newer, all you need do is plug a USB GPS receiver into one of the eRVin USB ports!
So why does eRVin need a GPS?
eRVin is an automation system, the more things it knows, like location, the more useful the things it can do. Here are some ideas:
- Set specific lights to go on/off at sunset/sunrise. This can only be done accurately if the location, date and time are accurate. Sure you could manually enter a lat/lon but who want’s to change that every time you move in the RV? With a GPS the sunset/sunrise time will be automatically accurate no matter where you go or what time of year it is.
- Presence detection. If eRVin knows it’s location precisely, and your cell phone location is also known precisely, eRVin will know if you are “home” or “away” and make take appropriate actions. One example for this would be to shut off the electric water heater when no one is home and turn it back on when someone is home. Another is to turn on the porch lights if you arrive home after sunset. Etc. Etc.
- Security Geo-fence. Know if your RV moves when you are not there, like maybe the service shop is taking it for a joy ride?
- Trip logging, track your movement, speed and other info to log where your coach has been.
- This is the tip of the iceberg, what are your ideas?
GPS Installation
This is the low cost receiver I am using and recommend. Last time I checked (9/2022) it was $15 on Amazon. It has been working reliably for me.

eRVin version 0.3 or newer: just plug the receiver into one of the free USB ports on eRVin! The drivers and proper configuration are all set up in this version.
Also a gpsd node has been added to Node-Red along with a supporting flow to get you started. For those without a version 0.3 or newer eRVin image, you can download the flow from here.
eRVin version 0.2 and older: you will need to install gpsd on the Raspberry Pi via the procedure below:
-
- VNC into your eRVin system. Coachproxy users will need to use SSH.
- Open a terminal window.
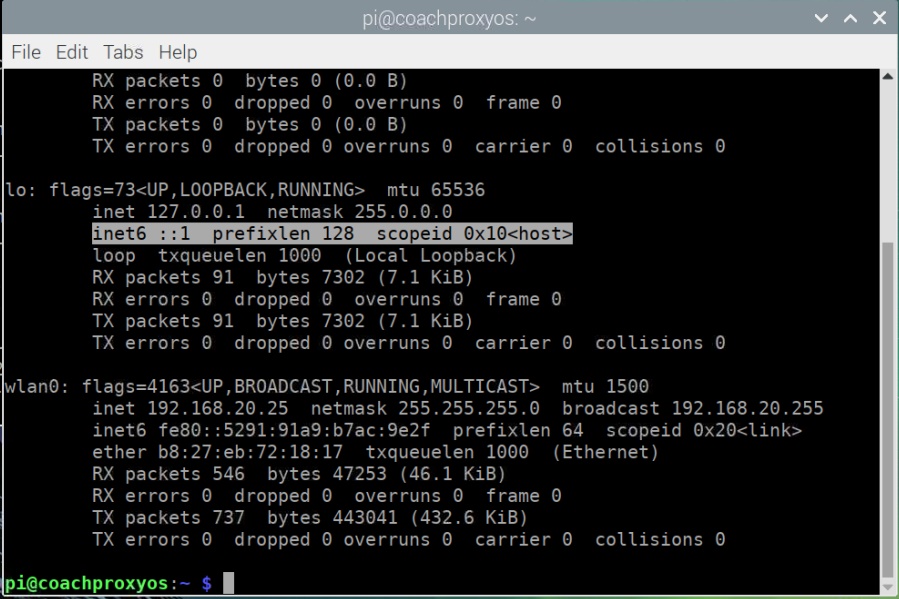
- On many systems, including the eRVin and coachproxy images, IPv6 has been disabled. Unfortunately gpsd will fail with dependency errors if IPv6 loopback is not enabled (I believe this is a bug in the installer). To see if you have IPv6 loopback running type
ifconfig
in the terminal window. If you don’t have the highlighted line shown below in the lo: section beginning with inet6 ::1, do the steps below, otherwise proceed to step 4. Note: for an alternate procedure that does not require enabling IPv6 click here.

- To enable IPv6 in a terminal window type
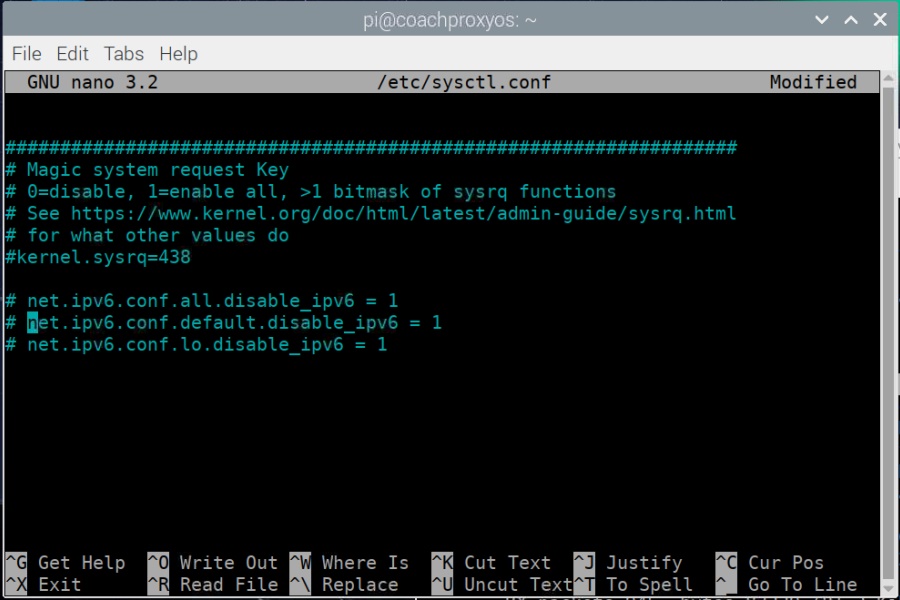
sudo nano /etc/sysctl.conf
Use the arrow keys to go to the end of the file and comment out (put a # in front of) the three lines that begin with net.ipv6… so it looks like below:
- Type Ctrl-X, Y, then Enter
- Type
sudo reboot
- When the system comes back up repeat step 3 to make sure the highlighted line beginning with inet6 ::1 is now showing under the lo: parameters.
- To enable IPv6 in a terminal window type
- In a terminal window type (or copy and paste):
-
sudo apt-get update && sudo apt-get -y install gpsd gpsd-clients
wait for the above to finish, then type
sudo reboot
-
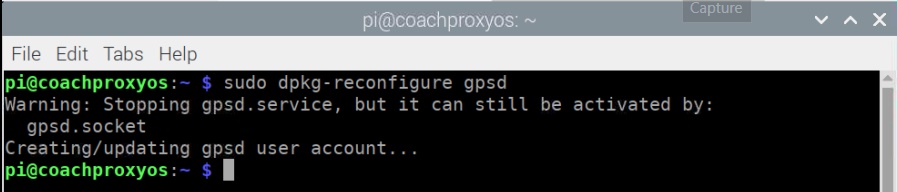
- Wait for reboot, open a new terminal window and type
sudo dpkg-reconfigure gpsd
You may receive a Warning, but that is OK.
- Now type
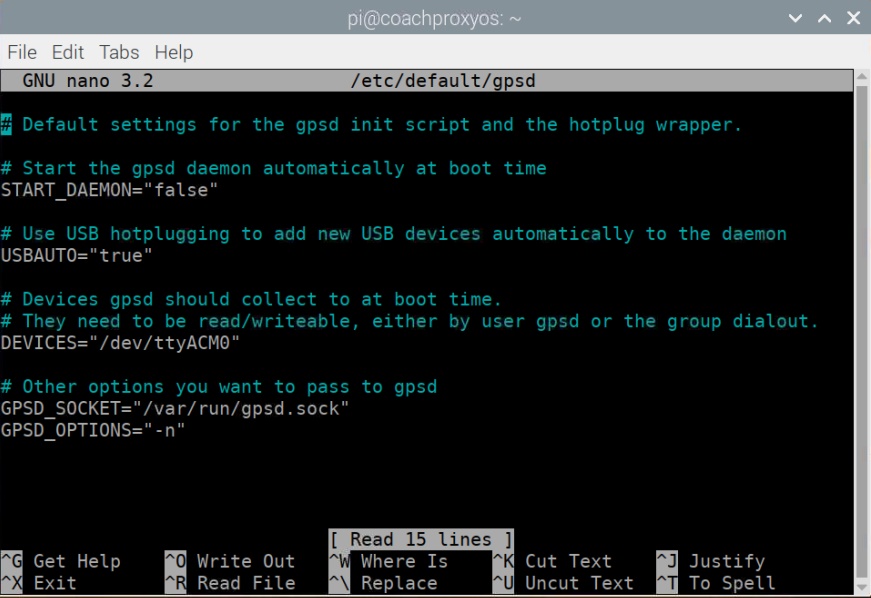
sudo nano /etc/default/gpsd
and modify the un-commented text so it looks exactly like below. If you prefer to cut and paste, you can copy the text from this file. When done editing, type Ctrl-X, then Y, then Enter
- Reboot the Raspberry Pi;
sudo reboot
- At this point most of you will want to go back and disable IPv6. I noticed a significant uptick in CPU utilization and have heard reports of performance degradation when it is enabled. Since most of us will not using IPv6 for the eRVin project anyway there is no harm in turning it off. To turn off IPv6 complete the following steps:
- Reverse the steps done in section 3a; In a terminal window type
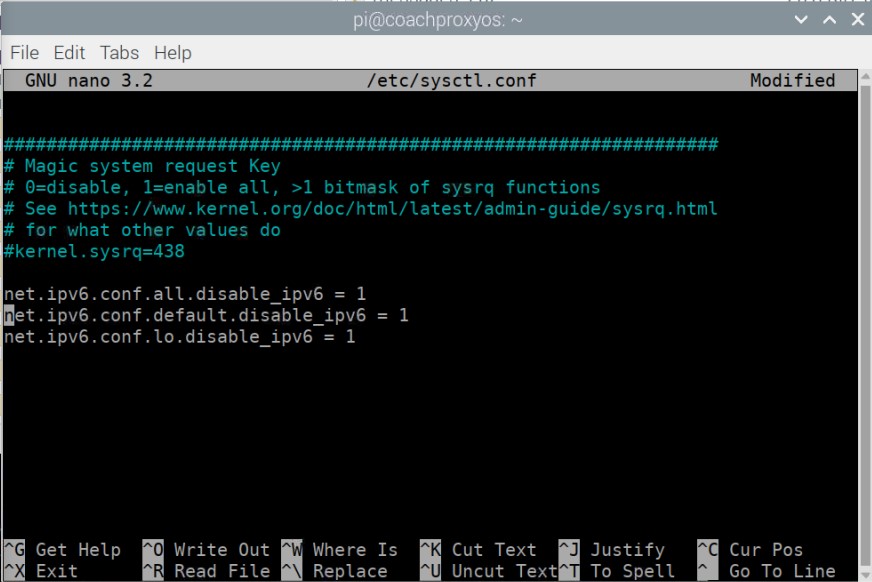
sudo nano /etc/sysctl.conf
Use the arrow keys to go to the end of the file and UN-comment (remove the # in front of) the three lines that begin with net.ipv6… so it looks like below:
- Next disable IPv6 settings in the gpsd configuration.
- In a terminal window type (or copy and paste)
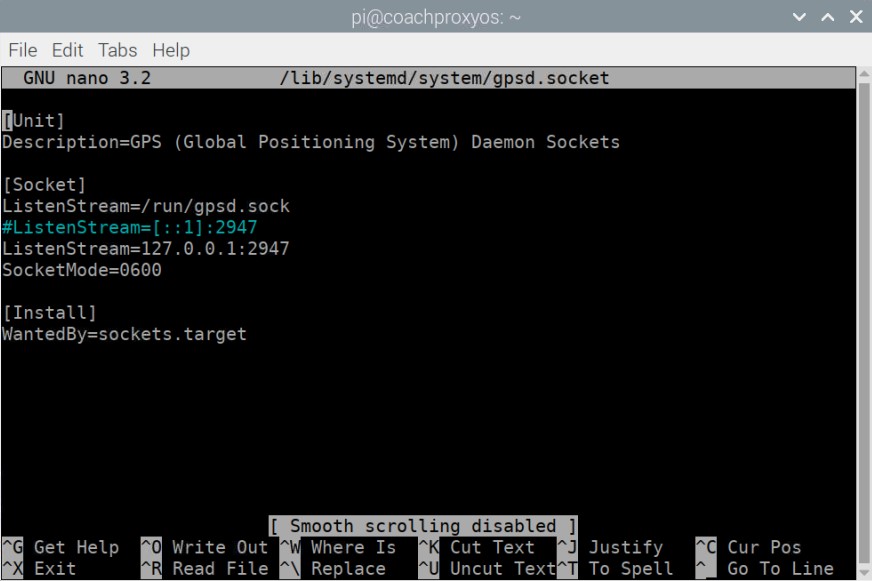
sudo nano /lib/systemd/system/gpsd.socket
this will open the gpsd.socket file:
- Use the keyboard arrows to position the cursor in front of the line highlighted in blue in the image above and type a # character as shown.
- Type Ctrl-X, then Y, then Enter
- Reboot the Raspberry Pi:
sudo reboot
- In a terminal window type (or copy and paste)
- Reverse the steps done in section 3a; In a terminal window type
- At this point most of you will want to go back and disable IPv6. I noticed a significant uptick in CPU utilization and have heard reports of performance degradation when it is enabled. Since most of us will not using IPv6 for the eRVin project anyway there is no harm in turning it off. To turn off IPv6 complete the following steps:
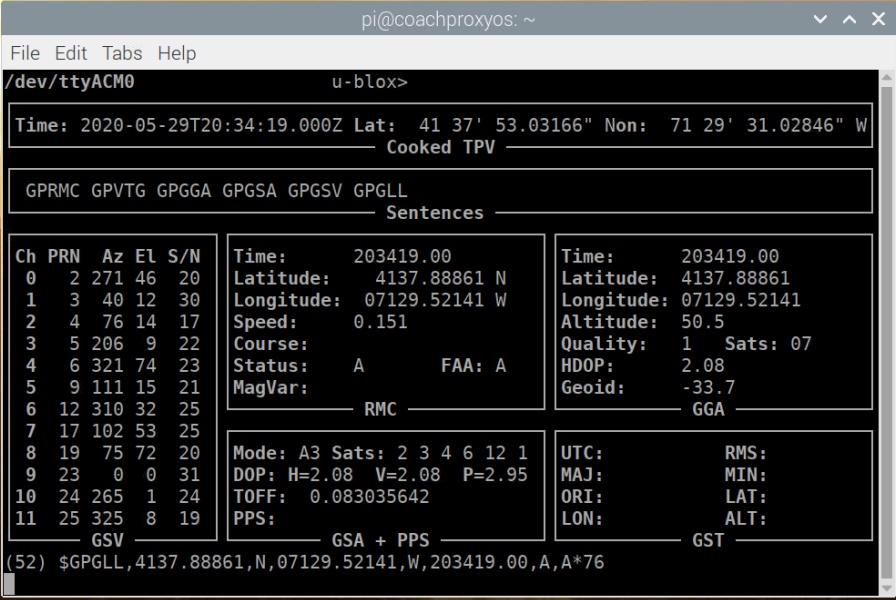
- That’s it! Assuming all completed without errors you should now be be able to capture GPS info. To test, first plug your GPS receiver into one of the Raspberry Pi USB ports. Position the antenna so the top faces the sky and so there is minimal metal between it and the sky (on my Class A motorhome the receiver works pretty well inside the coach). Now open a terminal window and type gpsmon, you should see a screen something like this, it will take a few minutes for the GPS data to be acquired and fill in:
- To exit gpsmon type Ctrl-C.
- Next you may want to download and import my sample flow into Node-Red.
[…] Adding GPS to your eRVin System […]
Not sure how I ended up with your site in my browser but I’m glad I did. I have a 2019 Entegra Anthem “W” – do you have the floor plan for it? Also I would like to know more information especially on the GPSD side of this along with possibly also linking into the Can bus data of the Chassis to read mileage, engine hours and also gen hrs(which should be on the rv-c net) Most of the add ons you have listed are already on my vega touch / firefly system how ever I would like to add a few more lights controlled by this system or the firefly. Any information or help would be apricated.
John, sent you an email…
[…] Adding GPS to your eRVin System […]