
How to Install Dataplicity for Remote Access to eRVin
This post describes how to install Dataplicity remote access for your eRVin system.
Note: CoachProxy users may also use this procedure, just think CoachProxy wherever you see eRVin written in the procedures below.
What is Dataplicity?
Dataplicity is a service that will allow you to use eRVin from anywhere you have internet access. I have found it to be efficient, fast, reliable and best of all it’s free for private use! In fact it is so efficient I use the Dataplicity connection all the time, even when connected to my local WiFi (where eRVin lives) making things simple and convenient – there is no need to switch to a different local eRVin WiFi connection.
Even better, Dataplicity will still connect to eRVin even if the IP Address of your eRVin system changes! It is normal for a device IP address to change occasionally (unless you take other steps with your router to prevent it) so this is a huge benefit.
The original CoachProxy included a similar service called ngrok and it is still available in eRVin (at least for now), however from my own experience and what I hear from others, it is not as reliable or easy to use as Dataplicity. In addition, the free version of ngrok reissues a new URL for every connection, which can be cumbersome to say the least. The Dataplicity URL is free and permanent.
Installing Dataplicity
The installation is a simple process. There are two procedures that can be utilized:
- Direct install via the Dataplicity App. Dataplicity apps are available for Android, iOS, Windows 10 and MacOS. This process does not require an command line typing and is described in detail in this post.
- Install via a Terminal prompt. This requires some form of access to a command prompt on your eRVin system but is a super simple copy and paste. This method is only recommended if you cannot run the Dataplicity app for some reason or if you feel more comfortable entering terminal level commands. Follow the procedure provided by Dataplicity.
Direct Install via the Dataplicity App
Note: This tutorial will show screen sessions from an Android smartphone but it should be similar to other devices. Click on any image to enlarge it.
- Install the Dataplicity app on a device that is connected to the same WiFi where eRVin is running:

- Run the app then click the Sign Up button:
- The next screen will ask for your email address, enter it and click Next. Note that your email will become your Dataplicity acount ID.
- On the next screen click the Scan for devices button:
- Your network will be scanned looking for Raspberry Pi (eRVin) devices.
- Normally it will return only one, or maybe two, devices. In the screenshot below it detected more devices on my network because I have multiple Pi’s running. If more than one device is detected you will need to know the IP address of your eRVin device. This can be obtained by looking in your eRVin app at Network Information which is under the System tab. In this case the device I want is 192.168.8.209. Click the green INSTALL button for the correct device:
- On the next screen click the INSTALL DATAPLICITY button.
- Next you will get a prompt to enter the username and password for the Raspberry Pi computer system that is running eRVin as shown below. The default username is “pi”. If you have not yet updated your system password, the default password for eRVin is “ervin2020”. (I believe CoachProxy has a default password of “raspberry”). Check the box next to “root password (sudo)” as shown below, then click CONNECT.
Note: If you have not changed your eRVin system password, when done with this Dataplicity installation please do so for enhanced security. That can be done via the System tab in the eRVin app (version 0.5 and newer).
- Dataplicity will connect to the eRVin system…
- …and begin downloading the Dataplicity software. Please be patent this can take up to 15 minutes:
- Eventually you will get a screen similar to the one below, click on the device indicated by the red arrow:
- Next you will get a screen like the one shown below, click on the three dots:
- From the dropdown that appears, select Wormhole:
- The next screen will look like the one shown below, click the switch to turn on the Wormhole. The URL shown to the left is unique to your eRVin system and permanent. BUT, don’t click on it just yet, the steps that follow must be completed first:
- Before using your private Wormhole link you need to finish setting up your Dataplicity account. (Note your Dataplicity account is completely separate from your eRVin System id and password). Go look in your email, you should have received an email (initiated in step 3) from Dataplicity, with a link to finish setting up your account. Click the Verify your account now button.
- Next you will be asked to set a password for your Dataplicity account. This is between you and Dataplicity and has nothing to do with the eRVin system. Once that is done, in your browser window you will get a screen like the one below:
- Click on the device as shown above by the red arrow and you should next get a screen with your unique Wormhole link as shown below. Click the Enabled switch to activate the Wormhole if not already enabled:
- Copy your unique Wormhole link and save it somewhere safe. This link is how you will access your eRVin system from ANYWHERE. Keep in mind it is essentially a passkey to your eRVin app so do not share it with others. Also make sure to record your Dataplicity Account ID (your email address) and password, you can always retrieve the Wormhole link by logging on to your Dataplicity account. Now, go ahead and click on the Wormhole link. This should bring you to the eRVin screen as shown below:
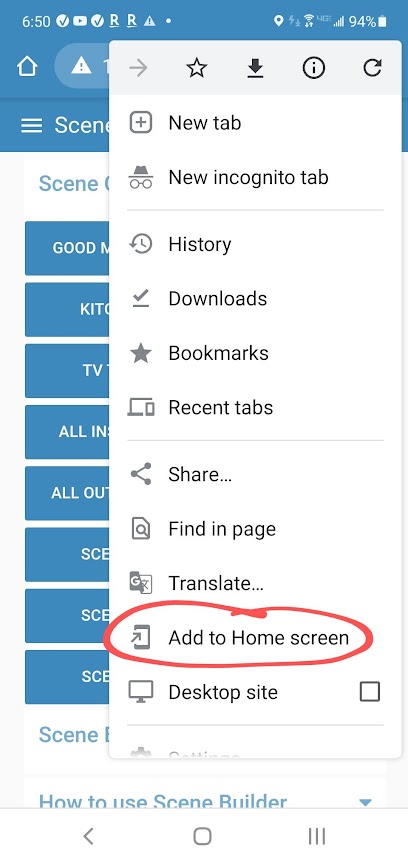
- Next we want to create a shortcut to eRVin to make it behave like an app and super easy to access. Click the 3 vertical dots in the upper right as shown above, then select “Add to Home Screen” as shown below (there is a similar process for iOS described here):
- Now you will get a prompt to save the shortcut, the exact procedure from this point will vary with the device and OS, but save it where it is convenient to access:
- This shortcut will will behave more or less like any other “app” and make it quick and easy to access eRVin, regardless if you are aboard your RV or somewhere far away. There is no need to enter a link or IP address, just click the icon!


Removing Dataplicity from your eRVin System:
In eRVin version 0.5 and newer simply go to Dataplicity in the System tab.
For other versions, entering the following 2 commands into a terminal prompt on the Raspberry Pi will remove the Dataplicity software from your system:
sudo rm -f /etc/supervisor/conf.d/tuxtunnel.conf
sudo service supervisor restart
I am trying to install Coachproxy on a new Amazon Fire tablet (android). Dataplicity installed fine. However, when I attempt to implement wormhole, I get the error “Webpage not available”…”net::ERR_CLEARTEXT_NOT_PERMITTED.” I search the web and I see some possible solutions. Have you seen this before and if so, any recommendation to fix. Thanks.
[…] How to Install Dataplicity for Remote Access to eRVin […]
An alternative to dataplicity that is working well for me is Zerotier. I’m using the free Basic account. Installation on the Pi and all of my other systems went smoothly and I can connect to the Pi via browser or using whatever remote package I want (vnc, xrdp, etc.).